
Part of me believes that watermelons were created to off-set the oppressive heat of summer. Do you agree? Watermelon is for summer. That’s why today I’m sharing this super cute DIY Summer craft with you – Painted Watermelon bags or pouches.
This is a great craft idea for the teens hanging out at your house occasionally moaning, “I’m sooooo bored” while simultaneously emptying your pantry of everything edible.
This is also an easy craft to make while you hide away in the air conditioning.
*This post contains affiliate links*
Let’s get started on these DIY Watermelon Bags

You will need:
Fabric Paint. Fabric Creations Soft Fabric Ink is my personal favorite and you can find it on the list of my top craft supplies .
White tote bags or pouches. I picked up these bag in a pack of three from Michael’s on one of my many trips there. Follow me on Instagram and I’ll take you shopping with me when I go. You can find something similar on Amazon here.
Paint Brushes.Use your favorite paint brushes, you don’t have to have anything specific. I’m a nylon / taklon type girl myself.

Step one is simple. Paint white fabric paint across the middle of the bag. You want to cover about half of the bag with white. You can’t mess this step up (well, I probably could) but don’t worry too much about it.
Next, we’re going to start adding the red paint to make the top part of the watermelon. First though we need to add in some white to the red paint. Don’t dilute all of your red paint with the white, just pull a bit of each color to one side and mix it together.

Gently start blending the pink color you just created into the white half way up the bag. Keep going up on the bag, adding more red into your mix as you go.
Just swipe from one side of the bag to the other in long strokes.
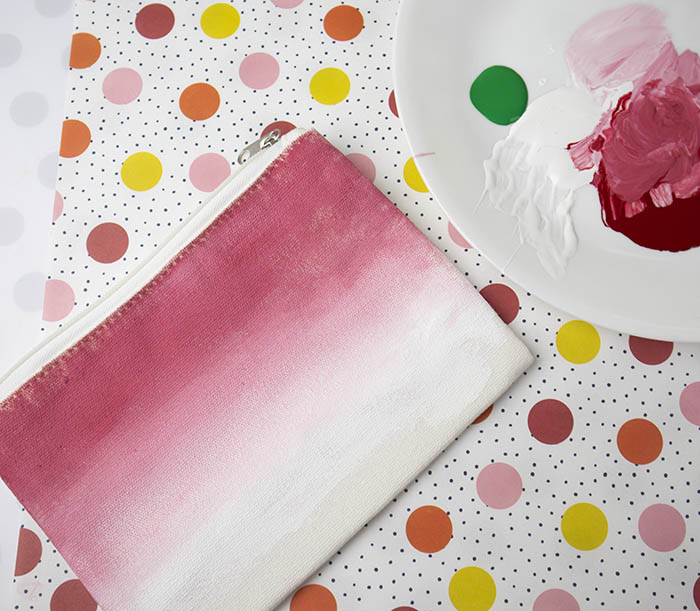
Eventually you’ll reach the top with your red mix that is mostly red. Using a clean paint brush, blend any areas that aren’t blended very well starting at the bottom and going up.
You want an ombre look. If you’re nervous to try it, start on a sheet of paper to practice before moving to your fabric bag.
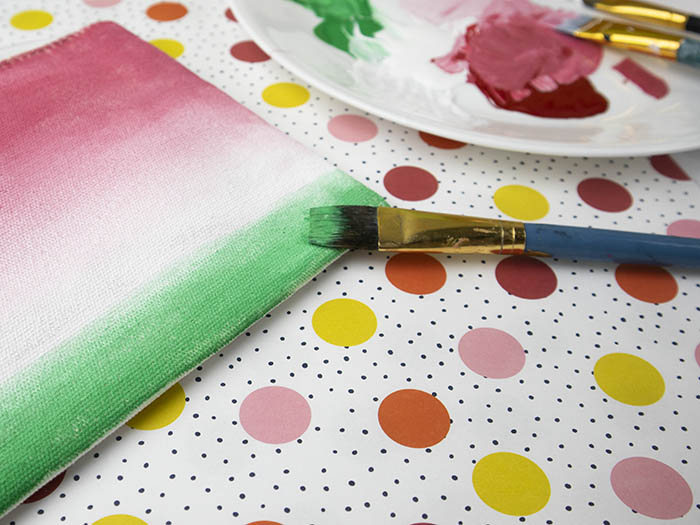
Next you’re going to paint the bottom green, mixing it into the bottom of the white color that you put on in the very first step.
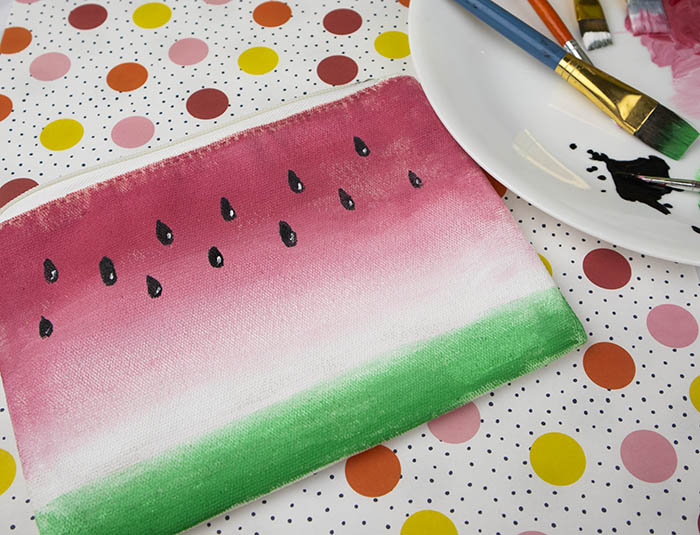
Finally use a small paint brush to make watermelon seeds. I also followed up with a tiny white accent on each watermelon seed. This is up to you.
Let this side dry and then flip over and repeat on the other side. Or you could leave the other side blank and personalize it using HTV vinyl.
You’ll love how cute this bag turns out.

If you love watermelon crafts, don’t forget to check out the sponge painted watermelon t-shirts . We did this craft a long time ago but my youngest daughter still wears her older sister’s shirt that she made.
I hope you’re having a sweetsummer full of fun crafts and activities.
The post Summer Fun – DIY Watermelon Bag appeared first on Clumsy Crafter .
Part of me believes that watermelons were created to off-set the oppressive heat of summer. Do you agree? Watermelon is for summer. That’s why today I’m sharing this super cute DIY Summer craft with you – Painted Watermelon bags or pouches.
This is a great craft idea for the teens hanging out at your house occasionally moaning, “I’m sooooo bored” while simultaneously emptying your pantry of everything edible.
This is also an easy craft to make while you hide away in the air conditioning.
*This post contains affiliate links*
Let’s get started on these DIY Watermelon Bags
You will need:
Fabric Paint. Fabric Creations Soft Fabric Ink is my personal favorite and you can find it on the list of my top craft supplies .
White tote bags or pouches. I picked up these bag in a pack of three from Michael’s on one of my many trips there. Follow me on Instagram and I’ll take you shopping with me when I go. You can find something similar on Amazon here.
Paint Brushes.Use your favorite paint brushes, you don’t have to have anything specific. I’m a nylon / taklon type girl myself.
Step one is simple. Paint white fabric paint across the middle of the bag. You want to cover about half of the bag with white. You can’t mess this step up (well, I probably could) but don’t worry too much about it.
Next, we’re going to start adding the red paint to make the top part of the watermelon. First though we need to add in some white to the red paint. Don’t dilute all of your red paint with the white, just pull a bit of each color to one side and mix it together.
Gently start blending the pink color you just created into the white half way up the bag. Keep going up on the bag, adding more red into your mix as you go.
Just swipe from one side of the bag to the other in long strokes.
Eventually you’ll reach the top with your red mix that is mostly red. Using a clean paint brush, blend any areas that aren’t blended very well starting at the bottom and going up.
You want an ombre look. If you’re nervous to try it, start on a sheet of paper to practice before moving to your fabric bag.
Next you’re going to paint the bottom green, mixing it into the bottom of the white color that you put on in the very first step.
Finally use a small paint brush to make watermelon seeds. I also followed up with a tiny white accent on each watermelon seed. This is up to you.
Let this side dry and then flip over and repeat on the other side. Or you could leave the other side blank and personalize it using HTV vinyl.
You’ll love how cute this bag turns out.
If you love watermelon crafts, don’t forget to check out the sponge painted watermelon t-shirts . We did this craft a long time ago but my youngest daughter still wears her older sister’s shirt that she made.
I hope you’re having a sweetsummer full of fun crafts and activities.
The post Summer Fun – DIY Watermelon Bag appeared first on Clumsy Crafter .
When you think of making a mosaic, sometimes you get stuck on the details. The process behind doing a true mosaic can swamp you. That’s why today I’m going to show you how to do this super simple DIY Garden Pot makeover. It’s a simply spring garden craft that will have a big impact.
First, let me disclose that this project is 4 YEARS in the making. What? Yes. I originally did this project 4 years ago and then my computer crashed and I lost the original “how-to” photos. Last week I was digging around in our family cloud pictures and found them!
But since I loved this project, I still had these DIY terracotta pots so I took new finished project photos and we’re good to go!
So if you’re asking yourself if these will stand the test of time, the answer is yes. You’re looking at the proof.
This project is so easy that it only requires three supplies.
That’s it! But first – let’s have a little word about the glass tile pieces.
Glass mosaic tile pieces can be expensive however a few go a really long way.
Here’s two simple ways to save money on them:
For this project I actually used glass pieces that I had used for another project. A few glass pieces goes a really long way.
To make this project, I simply put a dab of glue on a plastic sheet and dipped the back of the square tiles into the glue before applying them. Once they’re on the clay pot, hold them for a minute to make sure they set and won’t slip around.
The smaller pieces will set faster. If you’re using larger pieces, you’ll have to hold each one for longer.
Once you have a boarder or details finished, all you need to do is fill in areas with larger pieces or keep working with small details.
It’s easy! So easy.
Here’s a secret – when I made this I fully intended to grout between the glass tiles to give it a full mosaic look. Maybe one day I actually will but I really like it how it turned out without any grout or mortar.
So for now I’m leaving it.
I like it. A lot.
Plants like them so much that they weep for joy and then lose all their water and die… or at least that’s what I tell myself. Plastic plants are my friend.
That just makes me happy.
So simple. So fun. So easy.
So…so… so… in love with these simple garden crafts.
Love these? Check out the DIY Concrete Garden Balls .
The post Easy DIY Mosaic Garden Pots appeared first on Clumsy Crafter .
I have something embarrassing to tell you, my friends. ( Deep breaths )… I know this is ajudgment free
zone ( because yall forgive me for having the world’s worst looking hot glue gun
).. so here it goes….. My front door is naked. Naked. It’s bad enough that the previous owners painted it a very unfortunate shade of peach but now it’s naked on top of it. That’s why I had to take drastic measures. Introducing the 10 Minute, so easy your 10-year-old can do it, DIY Spring Wreath.
This simple spring wreath really will take you only about ten minutes and here’s the best part – this one cost me about $10! Winner, winner, chicken dinner.
If you follow me on instagram then you know that I’m a die hard Michaels or Hobby Lobby shopper. I love those two stores. Plus the area that I live in doesn’t have a real Wal-mart. We have a tiny neighborhood store that has basic groceries but no clothes or craft supplies. So the other day I made the journey across the bridge to the next town to go to their big Walmart.
Y’all. They had the best grapevine wreath form for only $5! It’s flat and I love it. So of course I had to grab some other things to go on it and save my poor naked door.
One of the things I picked up was three bunches of these fake yellow alstroemeria for $1 each. I was giddy when I looked at the price tag. I love anything you can get for a dollar.
After that I wandered over to the ribbon section and picked up some navy gingham ribbon to complete the wreath.
A grapevine wreath form, ribbon, three small bunches of flowers, hot glue and a glue gun is all you will need to make your own DIY spring wreath.
I like gingham butthere’s
so many options when it comes to ribbon. You could even use black and white buffalo check ribbon as I did on my valentine’s day wreath
.
To start, cut off the long ends on all of your flowers. I cut my flowers to about 5 inches for each flower.
Next I started laying them out going from the top down, making sure there weren’t holes where you could see the wreath form. Glue those flowers down. I used about one bunch of flowers per section.
Once you have one bunch of flowers glued down, take a small piece of your ribbon, that will wrap all the way around your wreath form and glue it in place directly under your flowers at a slight angle.
If you’re confused, keep reading and look at the pictures below.
Now do your second bunch of flowers in the same way but place them so that you can see the ribbon over the top of them. Repeat the same process including placing a piece of ribbon at the bottom of that section.
Now it’s time for the third and final section. You’re going to do it the same exact way except for one part.
Start the flowers slightly below the second ribbon again but this time you want to tuck the ends of the flowers down into the grapevine wreath as you go.
Why? Because this is your final section and you don’t want the green ends hanging out from under the ribbon.
It’s easy to tuck them down into the wreath but if you have problems with hand strength or can’t get them into your wreath, you can glue them down extra well and then clip off any longer parts that would show out from under the ribbon.
The best part about making your own wreaths and crafts is that you can do whatever you want! Make this wreath what you want it to be.
I have a video that I’m working on to show you this project that will hopefully be up in a few days. If you want to make sure you see it, follow me on Facebook and remember to turn on notifications so you see posts from Clumsy Crafter!
The post Easy DIY Spring Wreath – 10 Minute Craft appeared first on Clumsy Crafter .
Summer has an anthem. Did you know that? It’s not all the classic songs that you’re thinking about… nope. It’s the kids and teens of the world that sit there and in unison say, “I’m bored”. Hopefully, this super simple summer craft idea will give them something to do and make your windowsills and shelves look cute all at the same time.
Aloe is just a great plant to have around. My grandmother had pots of aloe spread throughout her house. If you burned your hand off she would tell you just to put some aloe on it. Luke Skywalker when his hand got burned off with the lightsaber? Probably just needed some aloe.
With cooking skills like mine, I should have an entire aloe garden but I don’t because I kill all green things. We’ll see how long this aloe plant lasts . That plant next to it in the picture? Fake. Yup. That’s why it’s still green. Air plants? Killed them too and all they need to live is air.
This is going to be one of the simplest crafts shared on this site. You cannot find an easier craft. If you can spread some paint around and then drop a plant inside a pot, you’re good to go.
This post contains affiliate links.
How to Make a DIY Pineapple Aloe Pot
To make this craft you’ll need:
Let’s talk about paint– I used outdoor paint because I had it. However, you do not have to use outdoor paint. You also don’t have to use the special paint made for clay pots. If you are buying paint for this project, buy the paint for clay pots. But if you already have plain jane yellow acrylic paint – use it! The same is true for the white paint. Outdoor paint and the special paint for clay pots is made to withstand the wear and tear of being outside. If you’re not placing this outside, don’t worry about it. If you want to use this outside, you can still use regular acrylic paint and seal it with Outdoor Mod Podge or another sealant.
To start, paint your entire pot including the top rim with one coat of yellow paint and then let dry. While waiting for it to dry may I suggest a rousing game of Connect Four ? My family is addicted to that game but I always loose.
Once that’s dry, do one more coat and then let it dry as well.
Don’t forget to paint an inch or two down inside the pot, like I did.
Once your yellow paint is dry, it’s time to add the details. I used white paint but you could use black or gray. To add the details, I painted upside down V’s in vertical rows. I did one row with 3 V’s and then moved over and started the next row with 4 V’s a little higher so the rows were offset.
You can also go over the white paint with a second coat if you like.
Once the white paint is dry, paint on a sealant such as Mod Podge or DuraClear Varnish. This step is optional. I didn’t do it, to be honest, but it will make your painted pot last longer and keep the colors brighter.
Once your clay pot is dry, it’s time to transplant your aloe plant. Or… if you’re sure it’s probably going to die soon, just drop the plastic pot right inside the clay one to make changing it out later easy.
There you go… the easiest craft you’ll find on this site, apart from the free printables and cut files.
If you need another summer craft for a bored teen, or even for yourself… check out the Painted Watermelon Pouches or the DIY Watermelon Sponge Print shirt for a 90’s throwback.
And if you just skipped reading all of that and want to watch a video… here you go. Feel free to share on Facebook or Pinterest.
The post DIY Pineapple Painted Aloe Plant Pot appeared first on Clumsy Crafter .