
While walking through Hobby Lobby the other day, my 9 year old paused in front of a display of all different kinds of nativity sets and confidently proclaimed that nativity sets are one of her favorite things. Me too kid, me too.
Santa is fun but when it comes to Christmas, nativities are the best reminder of what Christmas is truly about.
Last year my oldest girl’s Acteens group made these wooden block DIY nativity sets to sell and raise money for the Lottie Moon Offering. I liked it so much that in February, I made these adorable Valentine’s Day couple using the same steps and supplies.

I love how those turned out. You can find the instructions for these farmhouse style valentines here .
But since it’s Christmas, you’ll probably want to stick to the regular nativity scene. Here’s a secret: I ripped the valentine’s ones apart to make the ones for this nativity scene.
It hurt but it’s ok, I can remake them again. However
Supplies to Make This DIY Nativity
- 1.5″ X 1.5″ wood board from the lumber store cut into 5.5″ and 6″ lengths.
- Small wooden balls – I used 1 1/4″ Dowel Caps from Hobby Lobby
- 12″ of thin gold or copper wire – I used 20 gauge wire
- A wooden star – gold, silver or bronze
- Burlap pieces in two different tones. You can also use felt.
- Paint in skin tones and white
- hot glue
- twine
- fine sand paper
First, Cut your wood pieces and sand the edges until smooth.
Next, paint your pieces. The round balls (dowel caps) will be the heads and should be painted skin tones. I chose to paint my Mary figure’s clothes white and Joseph’s clothes a light brown. You can vary the colors as you wish but a light blue for Mary is very traditional with a brown being traditional for Joseph.
Once you have your pieces painted, attach the heads to the top of your pieces using hot glue.

Take your first color of burlap and cut it where it will wrap around your doll, including the head and glue in place.

Cut your wire and twist it around a thick marker or round object to make it twist.
Attach the star at the top using hot glue.
Once your star is attached to the wire and your Mary figure wearing her burlap covering, it’s time to glue the three pieces together. Make sure your glue gun is good and hot because you’re going to use a lot of glue.
Place a lot of glue along the side of one of the figures. Put the end of the wire on the same side until it’s the height you want it. Quickly press the other figure against the first one, holding the wire in place, and hold firmly until the glue is cooled and dried.

Now you have two people and a star but you’re missing an important part – a baby.
You can use a lot of different things to make the baby. I’ve seen smaller square blocks of wood or even a small ice cream scoop, like what comes with the tiny ice cream treats you buy in the summer.
However I wanted to use what I had so I pulled out a wide tongue depresser / craft stick and cut it to a length that I thought would fit well with the other two figures.

Once I had it cut to size, I swaddled it in burlap and secured it with glue, just like you would swaddle a real baby.
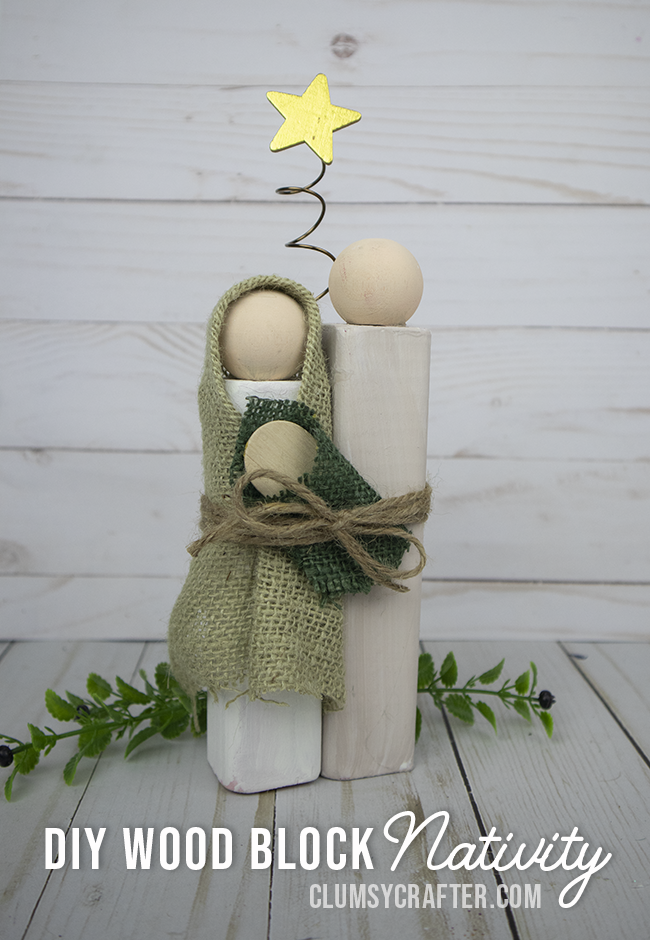
Once your baby is ready, glue him to the Mary and Joseph figurines and then tie twine around all of them until it looks like the example in the picture below:

Once you have those pieces made and glued together, you are done.
This is a great group project simply because you can’t just but one wooden star or two dowel rod caps. If you buy the supplies for this project, you’ll be able to make several.
It’s also a great group project or a simple DIY Christmas gift idea because they are very inexpensive to make.
For this craft, I literally spent nothing because I had all of the pieces. However the first time I made them for the Rustic Love Valentine’s version, I spent around $10. If you have to buy every single supply, you should still spend under $20. Most crafters have twine, wire, paint, and burlap scraps. Use what you have, make it fit your style and have fun.
The post DIY Wood Block Nativity Set – You Can Make This! appeared first on Clumsy Crafter .
In reply to Melissa .
The wood is 1.5″ X 1.5″ boards that you can find at that lumber store. I cut them in the 5.5″ and 6″ lengths.
I absolutely love these creations ! One of the most creative but yet minimal on Pintrest. I have one question if you could please answer . What are the sizes of the wood blocks ? Thank you so much!