
I’m super excited to have Pauline from My Altered State joining us today! It’s been a while since we’ve had a guest on Pretty Handy Girl, and this guest was certainly worth the wait! She’s joining us today to show you How to Build a DIY Decorative Ammo Box! This gorgeous crate may be for decorative purposes, but Pauline studied the construction of real ammo boxes to build it the same way the real ones are built. She’s amazing, and I know you’ll understand why in a minute.
I met Pauline at Haven last year, but I’ve been a fan of her blog way before we met. She is an avid upcycler and loves to use salvage materials in her projects.
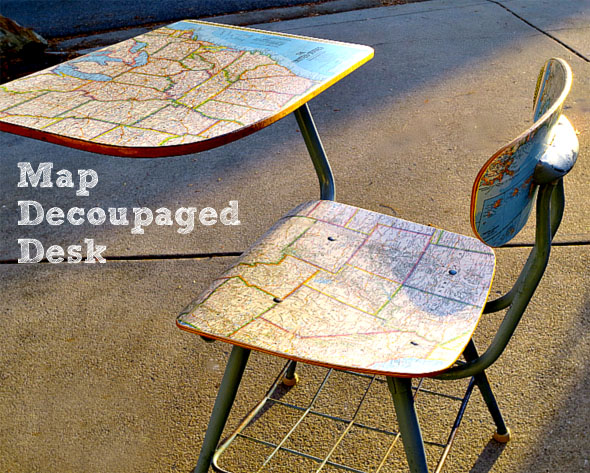
She has so many fabulous projects, I had a hard time picking a few to show you. Like this fabulous Map Decoupaged Desk/Chair!
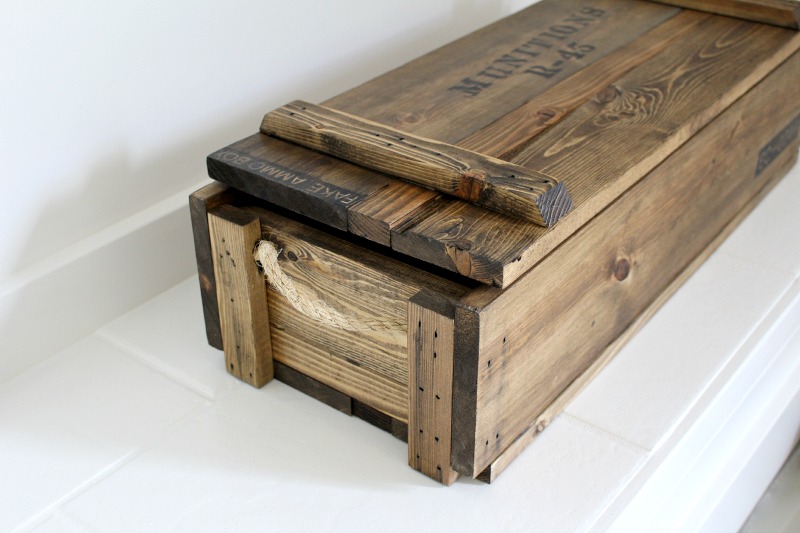
DIY Decorative Ammo Box
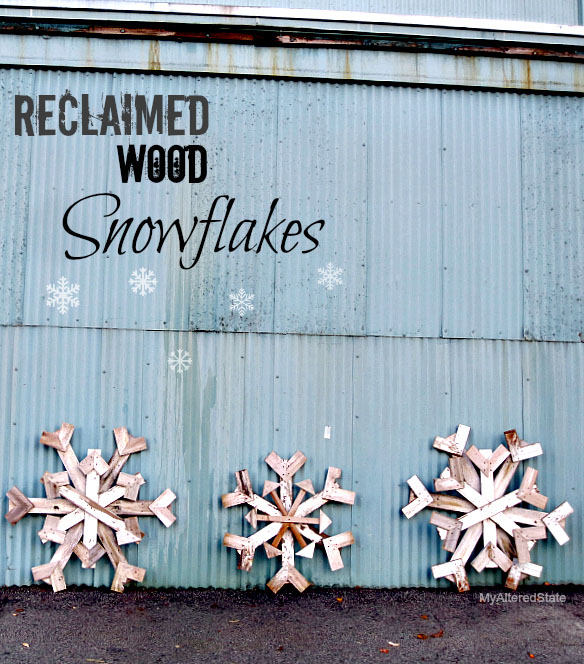
Or these beautiful Reclaimed Wood Snowflakes!
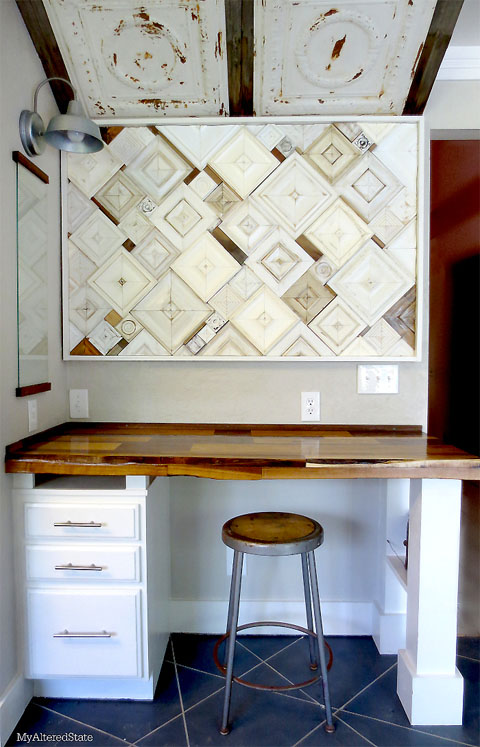
But, by far my favorite DIY project Pauline has completed so far is this desk and art installation in her kitchen!
And now, Pauline has an easy and unique tutorial for us today! Please clap, cheer and get on your feet for the amazing Pauline from My Altered State !
![]()
When I started blogging, I never dreamed that I would one day meet THE
Pretty Handy Girl in person, let alone find myself writing a guest post for her. So having said that, imagine how excited I am right now as I write my first guest post on Pretty Handy Girl! Now it’s time to get started. I hope you enjoy my DIY Decorative Ammo Box project.
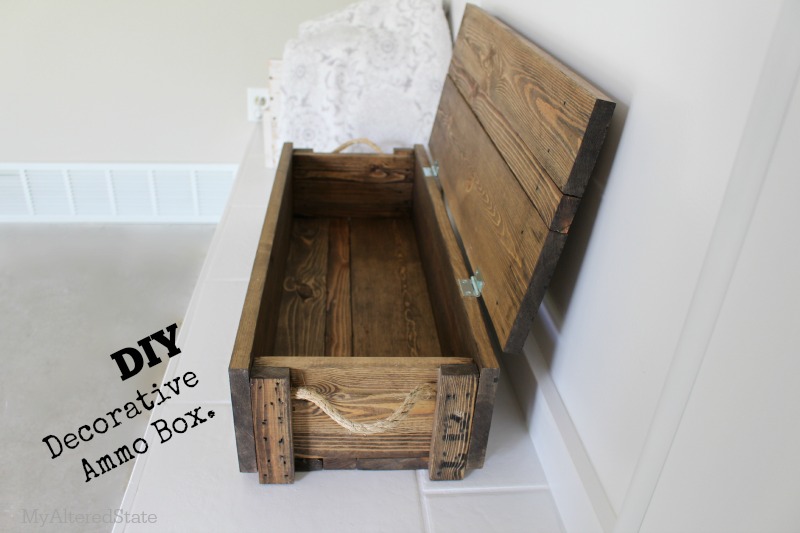
Wooden military ammunition boxes have been a staple in the vintage repurposing and upcycling world for a while. They are a versatile storage item with an industrial flavor, but sometimes they are hard to find. That’s when I get the urge to build.
In an effort to keep this tutorial from being too lengthy, you can find info on finishing and aging wood in this post . Now let’s get building.
DIY Decorative Ammo Box Materials:
To create a box with the dimensions of 27″ wide x 7″ tall x 10″ deep, purchase the following:
- (2) 1″ x 6″ x 6′
- (2) 1″ x 2″ x 6′
- (1) 1″ x 4″ x 6′
- Rope
- Gorilla tape
- Wood glue
- 2 Hinges
- Drill
- Drill bit same thickness of rope
- Clamp
- Pencil
- 2″ nails
- Nailgun (or hammer)
- Miter saw
DIY Decorative Ammo Box Cut List:

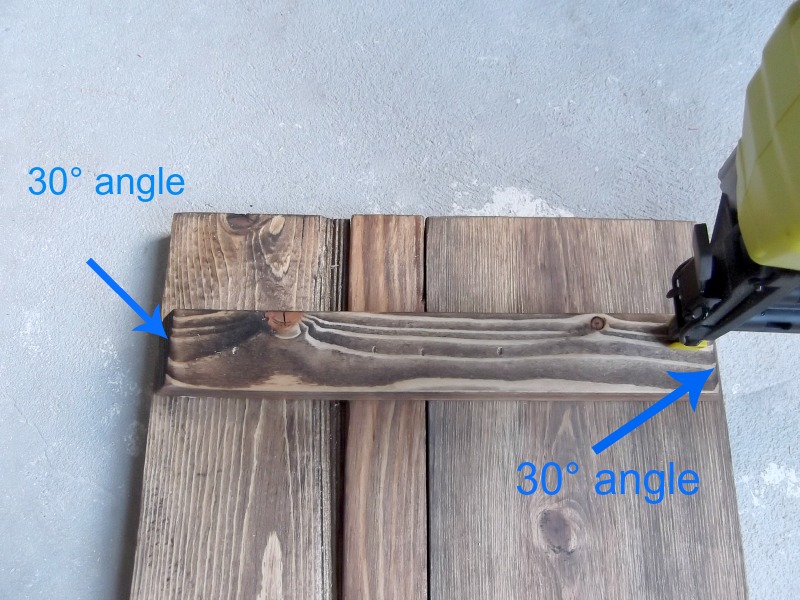
- 2 – 1″ x 2″ cut to 10 1/4″ (cut ends at 30 degree bevel as shown above)
- 4 – 1″ x 2″ cut to 5 3/4″
- 2 – 1″ x 2″ cut to 25 1/2″
- 2 – 1″ x 4″ cut to 25 1/2″
- 2 – 1″ x 6″ cut to 8 3/4″
- 2 – 1″ x 6″ cut to 25 1/2″
- 2 – 1″ x 6″ cut to 27 1/4″
DIY Decorative Ammo Box Instructions:
By copying the design of an authentic ammo box, I will show you how to build this DIY Decorative Ammo Box clear down to the way the handles are attached.
Lay out all your pieces for a “dry run” of the design:
- Bottom of box: (1″ x 6″ x 25 1/2″) + (1″ x 2″ x 25 1/2″) + (1″ x 4″ x 25 1/2″) boards.
- Front and Back of box: 1″ x 6″ x 27 1/4″ boards
- Sides of box (with rope handle): 1″ x 6″ x 8 3/4″ boards
Mark the location for your rope handles (approximately 2″ down from the top of the box.)
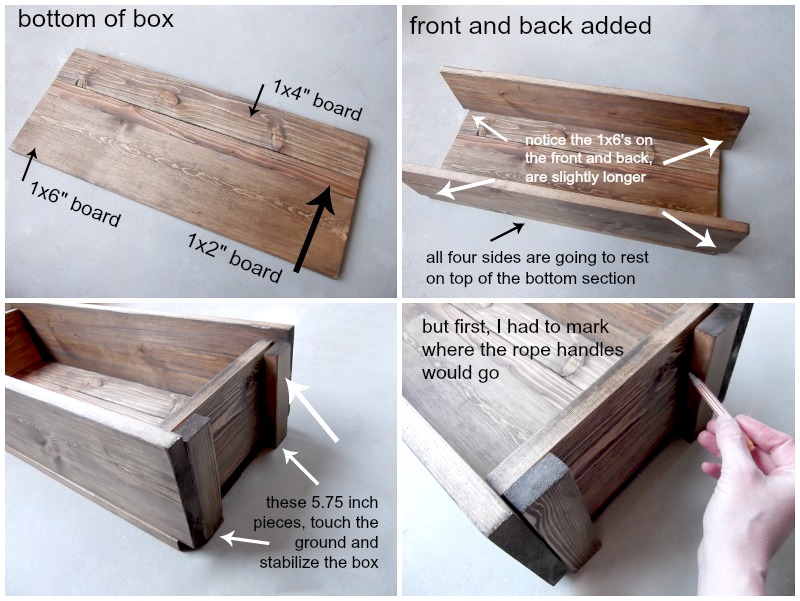
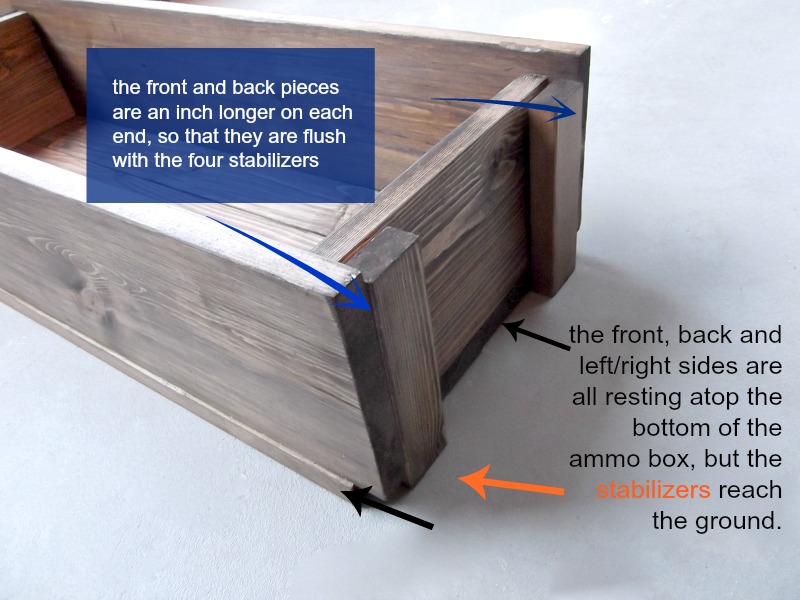
During the dry run, notice that the front and back pieces are an inch longer on each side. The stabilizing 1″ x 2″ pieces will rest on the ground, while the four sides of the box rest on the base.
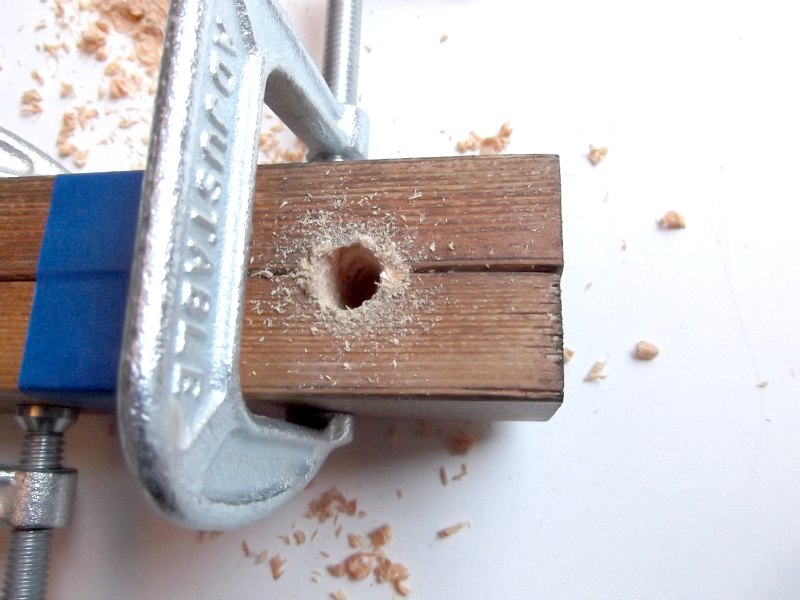
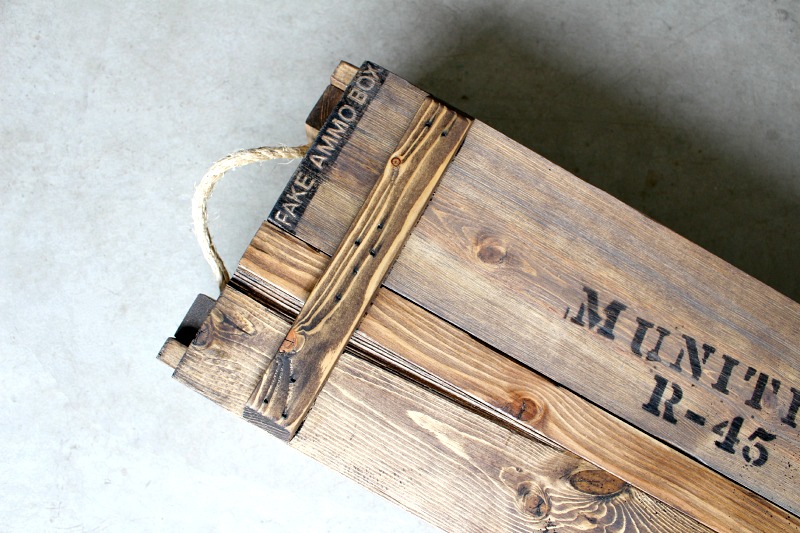
After all the ammo box collecting I’ve done over the years, you’d think I would have noticed how the handles were installed on the real thing. Nope. Never paid attention until now. Here’s a close up of the real thing:
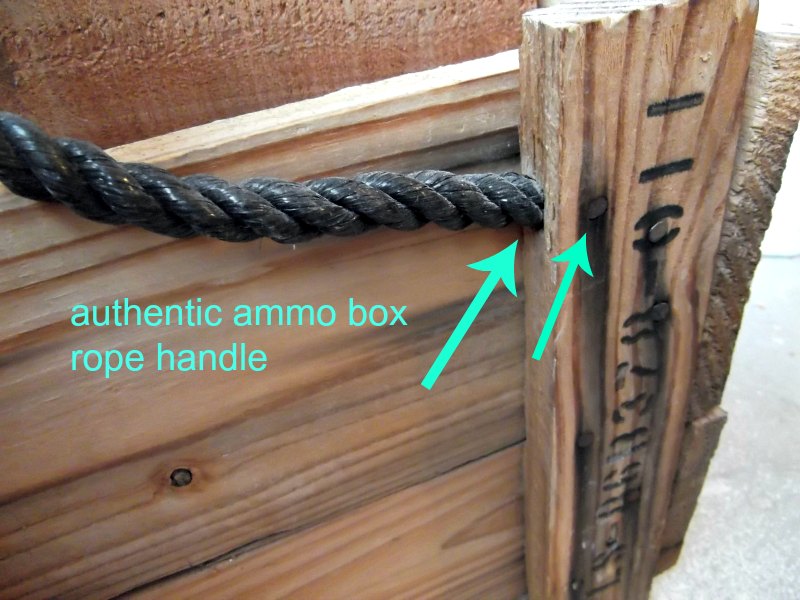
A notch is hollowed out where the end of the rope goes, and then secured in place with nails. This design actually keeps any rope ends or knots from being visible on the inside of the box. Clever.
To create the notch, clamp two 1″ x 2″ x 5 3/4″ stabilizer pieces together. Use the drill bit to drill a hole directly in between the two pieces of wood. Repeat using two more 1″ x 2″ x 5 3/4″ pieces.
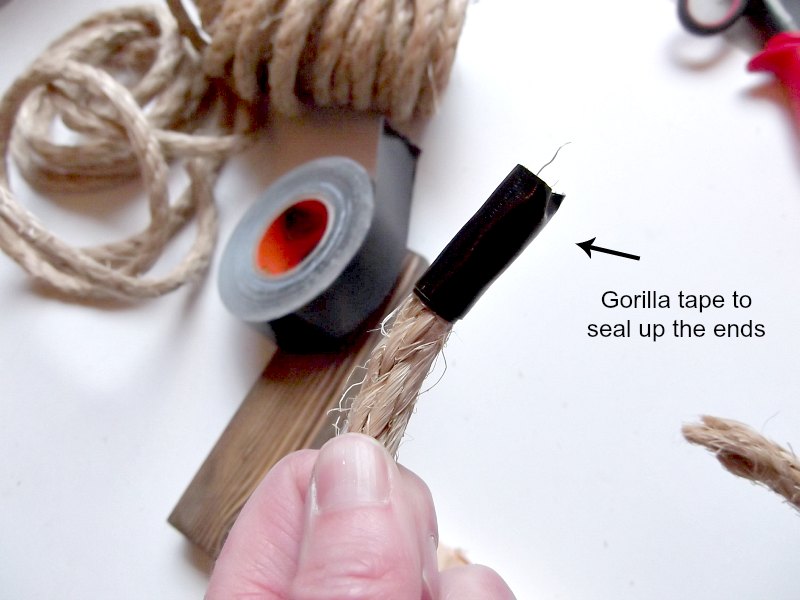
Use Gorilla Tape (or duct tape) to seal the end of the rope and keep it from unraveling.
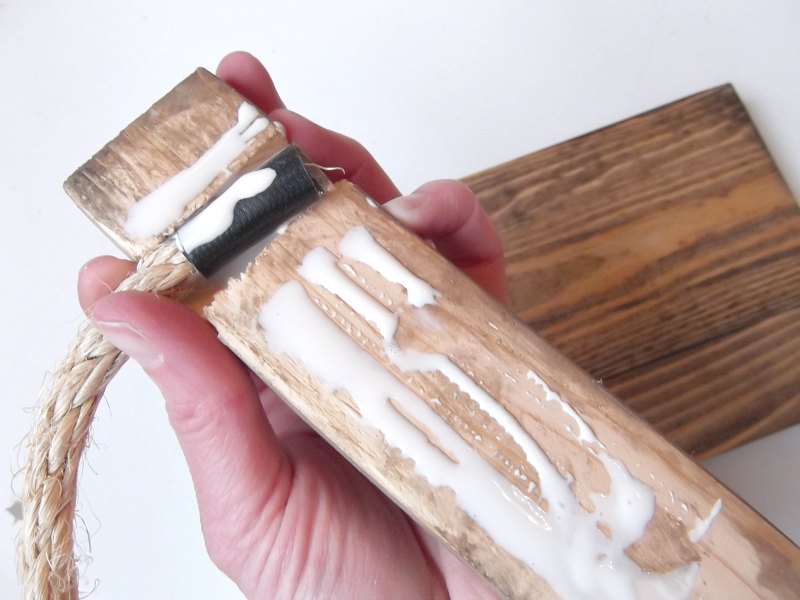
Rest the end of the rope into the notch of the stabilizer 1″ x 2″ and add wood glue to the stabilizer and the taped rope end.
While holding the handle (stabilizer) pieces in place, drive the first nails through the wood, into the rope end and into the side of the box.
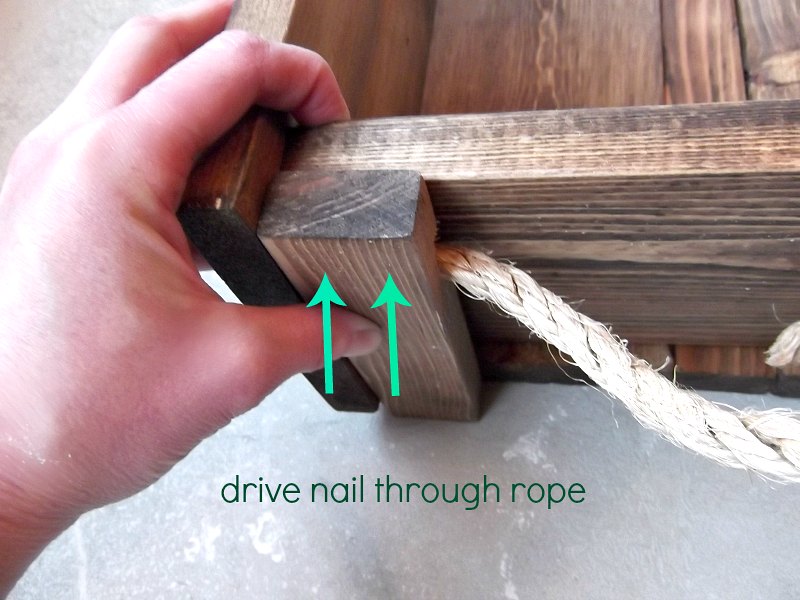
After driving two nails into the stabilizer pieces to secure the rope, drive two more nails through the front and back of the box, into the sides of the stabilizer pieces (as shown below.) Then go ahead and glue/nail all the sides together, while keeping it rested on top of the bottom boards. (This will help you keep everything aligned and square.) Once all the sides are nailed together, flip the whole box upside down, and glue and nail the bottom boards into the frame of the ammo box.

Assembling the lid:
The three lid boards are identical to the boards on the bottom of the box: (1″ x 6″ x 25 1/2″) + (1″ x 2″ x 25 1/2″) + (1″ x 4″ x 25 1/2″) The lid boards are secured together by the two 1″ x 2″ x 10 1/4″ cross supports (the two pieces with both ends beveled at 30°.)

Nail on the cross supports about 2″ from outside ends of the lid.
Attach the lid:
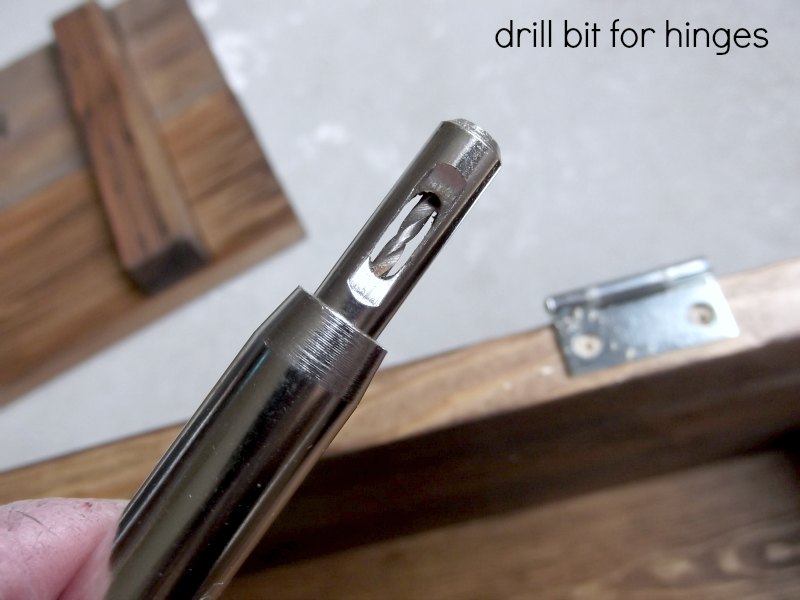
For a long time, if there were hinges involved in a project, I walked away in tears. That is, until I discovered this little invention: a drill bit for hinges (affiliate link). I can’t say it enough as this little guy has saved my sanity a thousand times over.
Drill holes for the hinges, about 5 1/2″ from the outside edges of the box, and attach the hinges to the box and the lid.
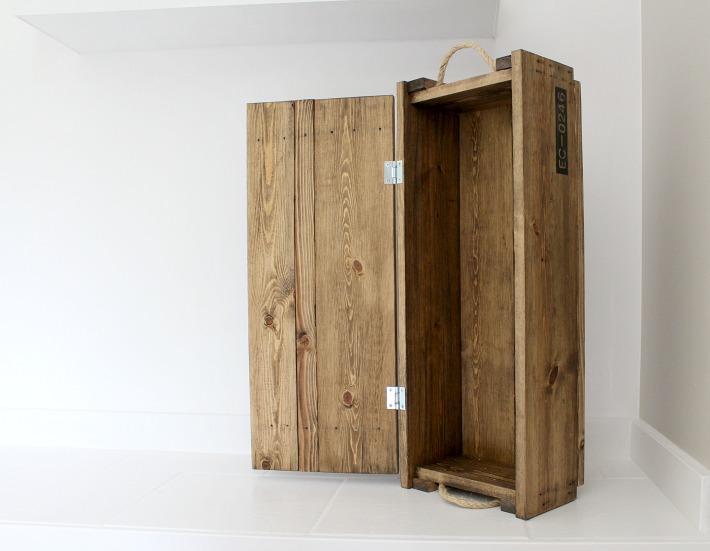
And that’s it!
You’ve got yourself an ammo box, that has never actually held ammo. What will you do with yours?
I can think of a lot of other things that I might hide inside this box, like Wii remotes. (After I add a lock, of course.) 😉
Visit this tutorial for the “how to” on the stain/distressing technique for this ammo box, where you’ll find great tips on aging wood with stain.
Hope you enjoyed!
Did I tell you Pauline is amazing or what?!
![]()
Talk about annoying, nothing matchs up right according to sizes. Bottom and bottom is half an inch to wide, supports about an inch short, sides about an 1/8 to long.
In reply to Pauline Henderson .
With a name like Henderson she has to be an amazing person ….maybe a cousin …thanks for the box idea
Your friend
Martin Robert Henderson 😎
[…] Build this box […]
In reply to Julie @ follow your heart woodworking .
Thank you!!!!
I cut all the pieces in you list and did a dry fit and none of them match up I think your measurements are off a little bit
[…] DIY Decorative Ammo Box […]
In reply to Vincent Shirey .
I actually just built this according to the directions and you are correct, some of the measurements were, frustratingly, incorrect. The four 8.75 inch pieces definitely needed to be longer. Also, 2 inch nails are much too long for those pieces, they protrude into the box (but are remedied by hammering the nails down so they lay flat). Also I found that the wood glue is not neccessary. But glad I found these instructions regardless.
I’m actually making this for a card box for my wedding. If you’ve played CoD zombie mode, it’s going to look like the mystery box.
[…] DIY Decorative Ammo Box […]
[…] I built for Brittany, at Pretty Handy Girl. You’ll find my tutorial for building your own military inspired ammo box, on her […]
OOPS…………..Your hinges are on the inside……………