

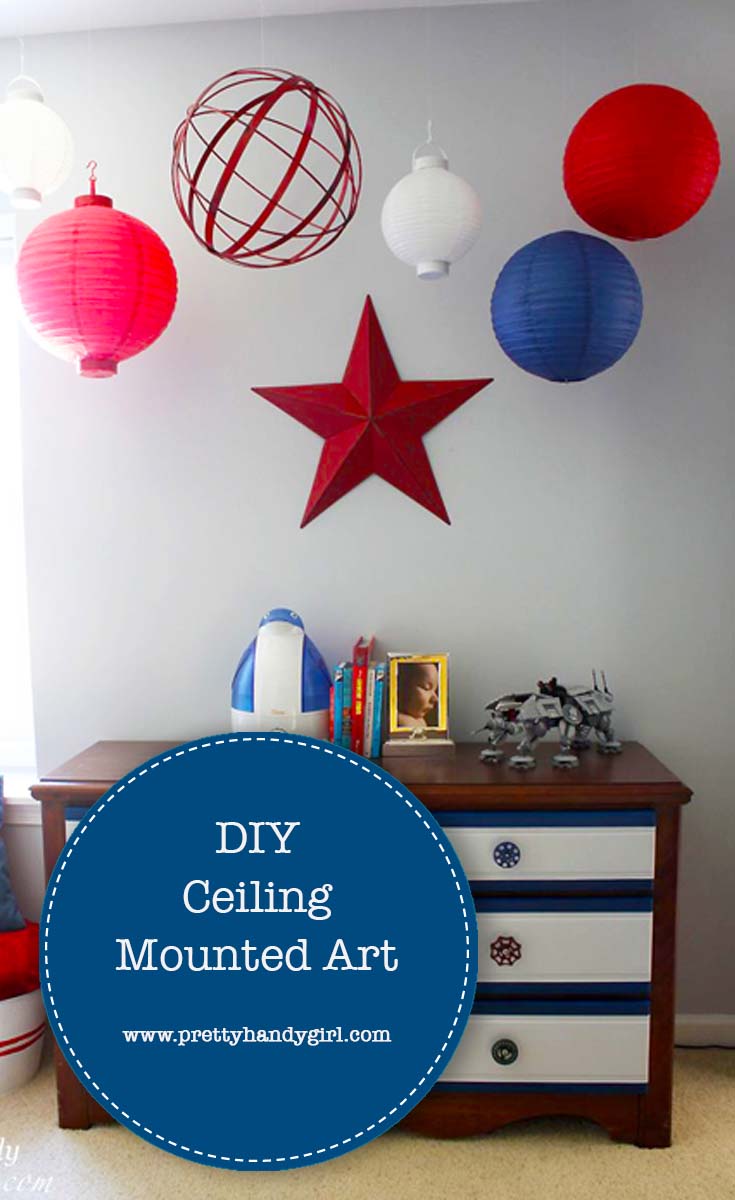
It’s Monday, and I have a cure for the Monday doldrums! Let’s hang some fun colorful spheres and lanterns to lift your spirits!
I came up with a great way to hang lanterns and spheres from the ceiling (regardless of where the studs were.) Plus, I reduced the holes from 7 down to 4 in the ceiling.
This is a simple project, here’s what you’ll need:
Materials:

- 1 – 8′ long slim piece of flat moulding painted with ceiling paint
- Tape measure
- Pin
- Pencil
- Drill with drill bits
- 2″ wood screws
- Cup hooks
- Finishing line
- Paper lanterns and a sphere (or other objects to hang)
- Scissors
- Touch up ceiling paint
- Small paint brush
Instructions:
Start by determining where you want to hang your art. Begin by knocking on the ceiling (or use a stud finder) to determine where your first stud is. Gently insert the pin until it stops (indicating a stud there.)

From the pin point, mark 16″ away from the pin and test for a stud in that location. Continue lightly marking where the studs are to the end of your art installation location.
(Do you know which direction your ceiling joists run? If you can’t look in the attic, you can make an educated guess. Most ceiling joists run front to back. Another way to tell is if you have a crawlspace and can look at the floor joists. They typically run the same direction as the ceiling joists. Finally, look at your roof. If the top of your roof, also called the ridge line runs side to side, your joists likely run front to back.)

Cut your moulding down to allow each end to be anchored on a ceiling joist. Pre-drill a hole in the ends of your moulding. For added strength, you can add another hole or two where other studs are located. Insert a 2″ wood screw into the holes.

Hold the moulding up against the ceiling and drive the screws into the location of the studs.

Continue until the moulding strip is secure against the ceiling.

Pre-drill holes for the cup hooks. Turn the cup hooks into the moulding until they are snug.

Paint ceiling paint over the screws to help hide them.

Tie a loop at the end of your fishing line. Tie a second loop at the bottom of the fishing line and hang your lanterns from the fishing line hooked onto the cup hooks. Vary the height of your lanterns and spheres until you like your art installation.
Now you have a super fun art installation! My son loves it. Some of the lanterns have battery-powered lights in them. We like to turn them on at night to act as a night light sometimes.

What do you think so far? Do you like my son’s bedroom? I can not wait to show some of the other projects I completed in his room.
![]()
Pin for later!
[…] https://prettyhandygirl.com/hanging-ceiling-mounted-art/ […]
[…] up soon…how I suspended the lanterns for a fun art installation! Plus, how I created drawer pulls using vintage spigot […]
Thanks you for sharing this! I’m just about to work on a project that needs this type of mount. Your way is so much easier than I was going to do! Thank you … thank you..
Such a happy & very cool impact statement here. I love it! I’ve thought about paper lanterns outside at times for party/fun times but have not tried as of yet.