

Finishing drywall seams has been compared to frosting a cake. But, as anyone knows, the first time you frost a cake, it doesn’t usually come out Cake Boss worthy. I figured it would be helpful if I gave you a few tips and tricks to get you on the fast track to learning how to finish a sheetrock joint like a pro.
As you might remember, we had to tear down our kitchen walls after we found termite damage inside. In all honesty, although it was a set back, I am really glad that we discovered it before we finished the kitchen.
I’m also thankful that Waste Management offered to set me up with one of those low profile Bagster® Bags. It was spacious enough to hold ALL of our construction debris.

I seriously think a little boy lives inside me because I could watch this all day.

(You can watch a video of a Bagster® Bag being hoisted in the air here .)
Now that the debris is gone, it’s time to focus on the task of finishing those drywall seams.

Materials:
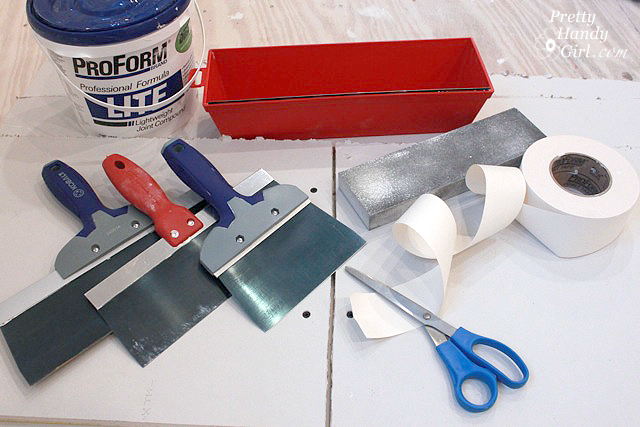
- Joint Compound
- Mud Pan (at least 12″)
- 4″, 6″ and 12″ taping knives – (You might need a 3 or 4 inch one if you have to dig compound out of the bucket.)
- Drywall joint tape
- Scissors
- Sanding sponge
- Damp rag
Instructions:
First fill all the screw impressions. Read more about installing drywall and the perfect screw depth here .

Use a small taping knife and spread just enough joint compound to fill in the hole impression. Scrape off any excess.

To show you the proper technique for finishing those seams, I made a short video (if you can’t view the video below, click here
.)
I hope that helped you learn how to finish drywall seams like a pro! Just remember, it might take a little practice, but you’ll get the hang of it quickly. 😉
Have a great weekend!

Disclosure:This is a sponsored post. Waste Management partnered with bloggers such as me to participate in its The Bagster® Bag Blogger Challenge. As part of this program, I received compensation to cover the cost of the Bagster bag and pick-up as well as my time. They did not tell me what to purchase or what to say about the products used for the The Bagster® Bag Blogger Challenge. Waste Management believes that consumers and bloggers are free to form their own opinions and share them in their own words. Waste Management’s policies align with WOMMA Ethics Code, FTC guidelines and social media engagement recommendations. A winner will be chosen by random and voucher fulfillment will be handled by a third party.
Thank you for your awesome website. For a gal who likes to do projects and learn how to do stuff herself, your site is much appreciated. It’s great to have a handy woman role model-especially coming from a woman who is ignored by customer service while admiring tools like a kid in a candy store. =)
[…] Add drywall to the front of the bench (Tips for installing drywall. How to mud a drywall seam.) […]
In reply to Tesha .
Tesha, it would help a lot if you can rent a drywall lift (or hoist). It can raise and hold the drywall sheets up while you screw it into the joists.
Had to drywall our whole house because of extensive water damage. Drywall takes forever to finish, especially when it is all ceilings. Any tips for ceilings?
[…] Brittany also has a great tutorial on how to finish drywall seams. […]
In reply to Naomi Mangan .
Naomi, thank you so much for taking the time to leave my your comment. It truly made my night. I will definitely have to look into the easiest way to create closed captions for my existing YouTube videos. Thanks for bringing that to my attention. Good luck with the drywall!
Brittany, I want say I am so very thankful for your site! I have always been interested in DIY projects and started planking one of my sons rooms. Before I finished-my boyfriend of 6 years and I parted ways…he took his tools with him. I bought my own through harbor freight with my tax refund and went a little crazy 🙂
A few weeks ago my finished basement was flooded and glad I have insurance but its not enough to cover the entire cost so I chose to do most of the DIY. Your site gave me the courage to go ahead and do whatever diy project I desire to do. Your tutorials are easy to follow (do wish for closed captioning on videos as I’m Deaf) and today I will tackle installing drywall myself. Again-I got most of my courage from you and your site. Thank you!
[…] Be sure to read my tutorial for mudding drywall joints and seams! […]
I have several places in my house where the corner joints were not taped or mudded, one at the ceiling. I’d love instruction on how to finish those seams correctly. I have a book, but it’s so good to see someone actually performing the chore. It’s really helpful.
Thanks, Judy
In reply to Andrea D. .
Andrea, ugh,the same thing was happening in our Laundry Room. I don’t know if this is the “orthodox” way to fix it, but I used an x-acto knife to cut any edges that were really sticking up. Then I used some glue (can’t remember what kind, maybe just plain Elmer’s.) to glue under the tape. THEN I used the joint compound as shown in the video. Only corners are trickier because you can’t hump the seam. Just put your knife in the crease and pull out, applying more pressure as you move away from the corner. Good luck.