

You may have noticed that pretty little seedy glass pendant light over our sink from my video the other day . It was a breeze to install, so I want to share with you the tutorial.
(I’ve included affiliate links for your convenience. I earn a small percentage from a purchase using these links. There is no additional cost to you. You can read more about affiliate links here .)
And now it’s tutorial time!
Materials:
- Light fixture
- Voltage tester
- Screwdrivers (or cordless drill)
- Wire cutters/wire strippers
- Wire nuts
- Needle-nosed pliers
- Ruler
Instructions:
Safety First! Turn off the power to the light fixture circuit. If there is no light fixture installed, check the power with a voltage tester. (I had to flip 6 circuits before I found the one that fed power to that junction box! And you know, I updated the labeling in our circuit breaker once I found it. This is required by code.)

Modifying the Height of a Light Fixture:
Use a ruler to measure how low you want your pendant light to hang. If you need to, put a piece of painter’s tape at that mark to give yourself a visual reference spot to see if you like that height. (Or corral a partner into holding the light fixture for you while you make up your mind.)

Lay your tape measure on the counter and stretch the light fixture out next to the ruler (be sure to set the glass shade on to gauge the full height.)

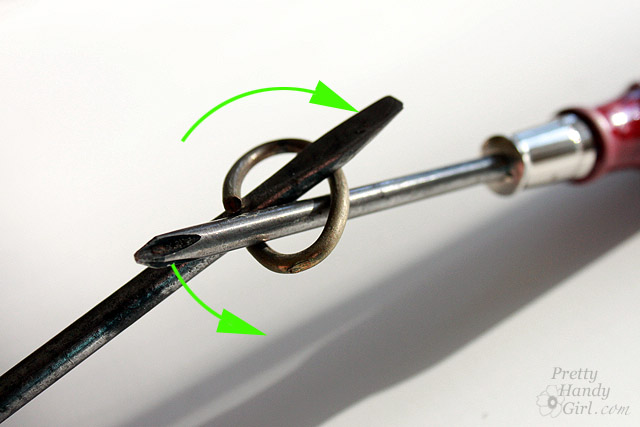
Assess where to separate the chain to reach the desired height.

You can separate chain links by using two screwdrivers and rotating them in opposite directions as shown below:
Cut the wiring about 6-8″ longer than the length of the light fixture.

Remove the washer from inside the canopy and pull the excess wire out of the light fixture. Discard or save the excess chain and wiring for another project.

Thread the wiring (that is still attached to the light fixture) through the threaded rod and back into the canopy.

Attach the chain back onto the canopy with the removable link (or simply open and close another link onto the canopy.)

Replace the washer and nut onto the threaded rod to secure to the canopy.

Split the ends of the wiring by gently cutting between the wires with scissors. Try not to cut through the insulation (you don’t want to expose the copper wires.)

Strip approximately an inch off the ends of the wires.
 Installing the Light Fixture:
Install the mounting bracket to the junction box in the ceiling by attaching the two screws (with the heads facing you) to the holes in the junction box.

Even though you have the power turned off, it is good practice to always attach the ground wire first. This will protect you from a lethal shock should the wires have power to them. Wrap the bare copper ground wire (may also have green insulation) from the light fixture around the green screw on the mounting plate. Then attach the ground wire to the bare ground wire from your house. Use a wire nut to secure them together. To properly connect all the wires, twist the two wire together clockwise. And screw a wire nut on tight until the wires begin to twist.

Next look closely at the two remaining wires on the light fixture. One should have ridges or a white line along the length…

…and should be connected to the white or neutral wire from your house wiring.

Last, but not least, connect the remaining wire to the black or hot wire from your house wiring.

Gently tuck the wires back up into the junction box.

Slip the canopy (cover that rests against the ceiling) up over the junction box. Line up the two inverted screws with the holes on the canopy and attach the end caps to the screws. It might be necessary to adjust the two inverted screws to get them the right depth to poke through the canopy and yet still be secured to the ceiling.

Attach the glass globe and secure it by screwing the collar inside and onto the light socket.

Insert a light bulb (remember to use a clear glass bulb when you can see through the glass bell-shaped cover.)

Turn the power back on. ( Proud Momma Warning:I wanted to show you my son’s painting that now hides the circuit breaker box in the kitchen. He’s one talented artist! And I’m happier staring at his painting than the ugly metal cover.)

Flip the light switch and hear the heavenly chorus of angels! I’m in love with this pendant light. The pendant light I chose is the 1 Light Uttermost mini pendant . I love how it coordinates with the seeded glass of our upper wall cabinets.

Especially after dark when it casts the coolest pattern on the ceiling and walls.

And it looks pretty in the daylight too ;-).


Disclosure:I partnered with GoldenageUSA for this project. I received a complimentary light fixture in exchange for mentioning their site on this blog. I was not told what to write, all ideas and words are my own. I only choose to partner with companies and brands that I believe offer good quality and service and that I would recommend to my own friends and family. I will always disclose if a post is sponsored and/or I was compensated.
[…] Install your hard-wired pendant light per the manufacturer’s instructions (or follow this tutorial to install a hard-wired pendant light). […]
[…] Pretty Handy Girl […]
[…] can put up shelves and sometimes they stay up. And we can strip wallpaper and paint skirting and wire up a plug, and get rid of computer viruses and we can even check the oil and the tyre pressures….and then […]
In reply to Jaime Costiglio .
LOL! Girl, you know I’d love to help you ;-). You paying my plane ticket?
PHG I’m pinning for reference, there will be A LOT of wiring new fixtures at our new place. Or you could just pop on over and do it for me too!
Just told my mom about your site. She’s been telling me for years that I can do DIy projects on my own (which I have always wanted to do but didn’t really think I had it in me) I’ve been peeping back at your site for a bit now and I think I’ve finally grown a set of my own! I’m starting with stripping and refinishing my bedroom set! Thanks for the inspiration!
Love the info!
Doing it right the first time is the key. I’m glad you shared how to correctly install it.
Always appreciate some good step by step instructions. Thank you for taking the time to teach people and giving simple straight forward steps.
Thank you for the easy step by step instructions. and hope im the luck duck.