

I’m so thrilled to be healthy again, that I’m doing a happy dance (see the video below if you want to witness it.) The pneumonia is gone and my boys are back in school. Can I get a “Woot Woot!”?
The bonus room/art studio renovation is rockin’ and rollin’ again and I have some progress to show you:

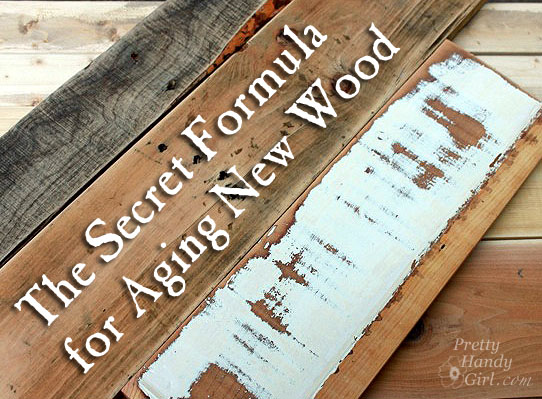
Are you amazed? I used almost all of the pallet wood and scraps that I had lying around my workshop! I purchased just a few 1″ x 4″ pine boards for the ledges. Then made those new boards look old !
The back wall of this room is one of the only vertical spots to hang artwork in the room. In addition to making it a feature wall, I wanted to maximize the art hanging space with some ledges.

I did a little Pinterest search to help me visual the finished wall. Shaunna’s colorful wall convinced me I could be eclectic:
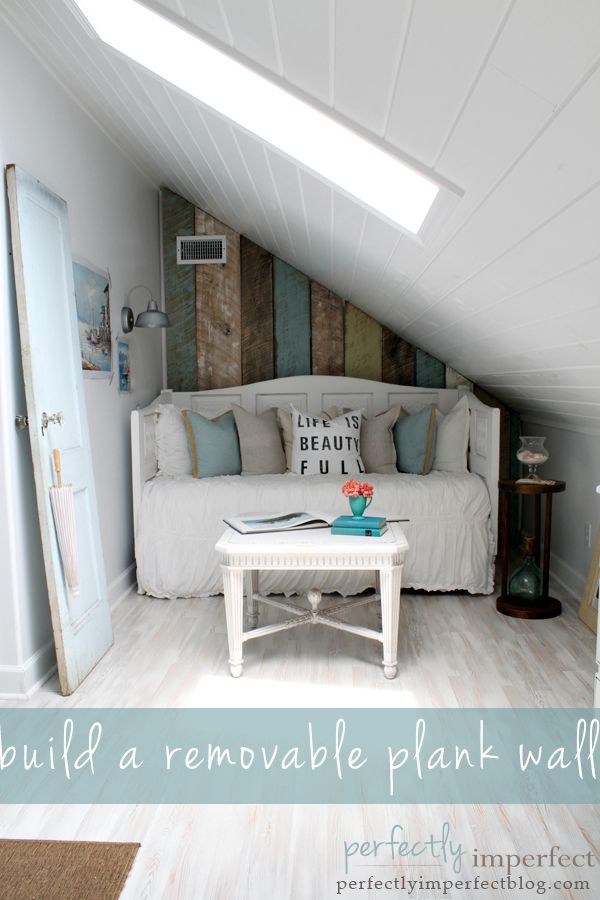
Source: PerfectlyImperfectBlog
And Sarah’s wall on Design Sponge proved that varying width horizontal boards look amazing:

Source: Design Sponge
You can see some of the other amazing salvage wood walls I used for inspiration in my Pinterest board .
Now, are you ready to learn how to install a wood plank wall plus a few tips and tricks for cutting all those boards and angles?
Materials:
( I’ve included affiliate links for your convenience. I earn a small percentage from a purchase using these links. There is no additional cost to you. You can read more about affiliate links here .)
- 3M Tekk Hearing Protection (I love the Digital Work Tunes, they ROCK!)
- 3M Tekk Safety Glasses
- Construction Adhesive
- Caulk Gun
- Finish Nailer
- 2″ finish nails
- 1 5/8″ screws
- Drill
- 1/8″ drill bit
- Pry bar
- Clamps
- Compressor
- Dremel MultiMax or Jig saw
- Miter Saw
- Pencil
- Level
- Laser level (optional)
- Scrap wood ( tutorial for harvesting pallet wood )
- 3 – 1″ x 4″x 8′ pine boards
Notes:
Just a few notes before we get to the tutorial. I cleaned and sanded down most of my scrap and pallet boards. Definitely wear a dust mask when sanding the wood. I also glazed, stained and painted several of the boards to get the eclectic look I wanted (more on that in another tutorial.)
There is some controversy about the safety of using pallet boards. Before I took on this project, I did a little research and ultimately decided to take the risk. I recommend you do your own google search and decide which information is relevant for your project.
Originally I was going to seal the wall with polycrylic. But, in the end I decided not to because I liked the colors and look au natural. If you are nervous about potential chemicals—or potential hazards of pallet wood—go ahead and paint or seal your wall.
Instructions:
Before you begin, make sure to remove your baseboard trim .

Start from the bottom and choose scraps the same width to run along the width of the wall. Use the level to check each board.
Squeeze some construction adhesive onto the back of your board.

Place the board onto the wall.

Check and make adjustments to level the board. Add a shim if you need to keep the board leveled.
![]()
Fire a few finish nails into the board to secure it.

Continue adding rows on top of the previous row. If your rows are separated by a window, be sure to check that both sides are level with one another or you’ll have some out of sync rows when they meet again on top of the window. (Using my Black & Decker laser level really helped with this task.)

To install a ledge, cut your ledge to the same width as the row beneath it. Lay it on top of the last row and check that it is level.

1. Add construction adhesive on top of the last row. 2. Set the ledge in place and secure with a few finish nails. 3. Pre-drill pilot holes for screws. 4. Drive screws into the pilot holes to give the ledge enough strength to hold any boys that might try using them as rock climbing ledges. (Don’t ask me how I anticipate these kind of antics…I just do!)

To make cuts around outlets or light switches: 1. Mark the width of the outlet plate (plus extra to account for the beveled angle). 2. Measure the height of the plate. 3. Transfer the height measurement onto the board. 4. Cut out the notch using an angled Dremel Multi-Max wood cutting blade (or jigsaw).

For more tips and tricks for cutting perfect angles and perfect sized boards, watch the video below:

Here is a fun progression animation of the wall as it was installed:

And…the moment y’all have been waiting for…the full reveal!


I can’t even begin to tell you what a huge difference this wall has made in the room. It is warm and it inspires me to want to create more art to fill up those ledges.

Have a great weekend! I’ll be working on finishing the art and craft room. Stay tuned for a few more tutorials and the final reveal!


Disclosure: This post is a sponsored post paid for by 3M DIY. I was not told what to write or what project to create. The ideas and tutorials are my own.
Watch 3MDIY YouTube videos here

Follow 3MDIY on Facebook Follow 3MDIY on Twitter
*Content and/or other value provided by our partner, 3M Frameworks.
[…] Give your home a brand new look with cool scrap wood wall piece. Learn how to make it here. […]
[…] After a few hours I had amassed quite a collection of pallet boards and scrap wood from the shop. I used ALL of it in this project. […]
[…] different pieces of scrap wood with different colors to create a beautiful accent way. Here‘s how to do […]
[…] different pieces of scrap wood with different colors to create a beautiful accent way. Here‘s how to do […]
[…] Source: Pretty Handy Girl […]
[…] different pieces of scrap wood with different colors to create a beautiful accent way. Here‘s how to do […]
[…] How to Install a Scrap Wood and Pallet Wood Wall […]
[…] Scrap Wood Feature Wall – Pretty Handy Girl […]
In reply to Pine Tree Home .
Wow! This looks fantastic!
And this was a WONDERFUL tutorial.
Thank you so much!!
[…] How to Install a Scrap Wood Wall […]