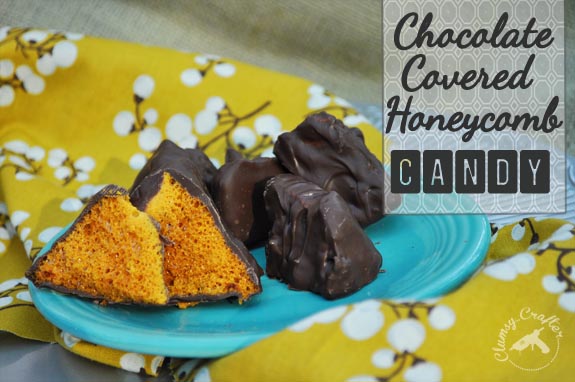
 I’ve always loved all things having to do with bees and honeycomb. Bees are just amazing creatures and their honey is so beneficial for us. So when I saw chocolate covered honeycomb a few months ago at a swanky grocery store, I grabbed it thinking it was real honeycomb! But it turns out that it’s really just a really impressive looking candy. So I had to learn how to make it and then share the recipe for Chocolate Covered Honeycomb with you!
When I say this is an easy candy recipe, I mean it. The youngest child helped me with all the cooler steps. It’s sweet and crunchy yet almost melts in your mouth all at the same time. It looks like a butterfinger candy bar but tastes like honey and is a much gentler texture. It’s good and would make amazing holiday gifts.
So what do you need to make it?
Honey, corn syrup, sugar, chocolate coating, a deep pan and parchment paper.
It’s going to seem like these ingredients won’t make much candy but it will! Do not double unless you need enough for an army.
Start by combining 1/4 cup of honey, 1/2 cup corn syrup, 2 cups of sugar and 3 tablespoons of water in a deep sauce pan and stir together. Now’s the important part. Turn the stove to a medium high heat and do not stir it! Let it cook together until it reaches 300 degrees or about 12-13 minutes. You want it to be a nice light amber color.
I’ve always loved all things having to do with bees and honeycomb. Bees are just amazing creatures and their honey is so beneficial for us. So when I saw chocolate covered honeycomb a few months ago at a swanky grocery store, I grabbed it thinking it was real honeycomb! But it turns out that it’s really just a really impressive looking candy. So I had to learn how to make it and then share the recipe for Chocolate Covered Honeycomb with you!
When I say this is an easy candy recipe, I mean it. The youngest child helped me with all the cooler steps. It’s sweet and crunchy yet almost melts in your mouth all at the same time. It looks like a butterfinger candy bar but tastes like honey and is a much gentler texture. It’s good and would make amazing holiday gifts.
So what do you need to make it?
Honey, corn syrup, sugar, chocolate coating, a deep pan and parchment paper.
It’s going to seem like these ingredients won’t make much candy but it will! Do not double unless you need enough for an army.
Start by combining 1/4 cup of honey, 1/2 cup corn syrup, 2 cups of sugar and 3 tablespoons of water in a deep sauce pan and stir together. Now’s the important part. Turn the stove to a medium high heat and do not stir it! Let it cook together until it reaches 300 degrees or about 12-13 minutes. You want it to be a nice light amber color. 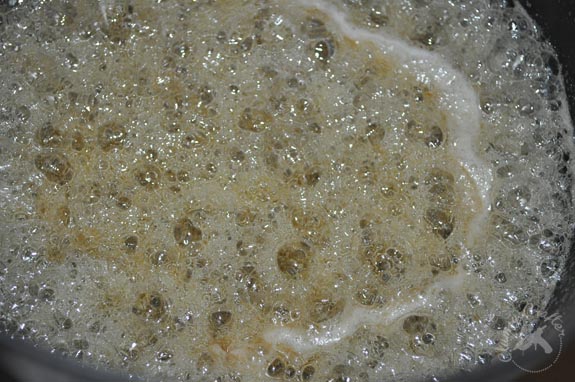
While this is cooking, line your pan with parchment paper and grease it liberally.
When it’s ready, remove it from the heat and stir in 1 tablespoon of baking soda. Watch out because it’s going to react quickly.

Whisk or stir it together briefly until well combined. Do not over stir.

Now pour it into your pan and let it set. Yes, that is the real color. It went from the light orange color above to the bright orange as it cooled.
Now you just need to let it set and harden for 30 minutes. Go do your nails or come do my laundry, whatever floats your boat.
When it is hard all the way through, take a knife and cut off pieces. Do this over a sheet of parchment paper because it crumbles easily.
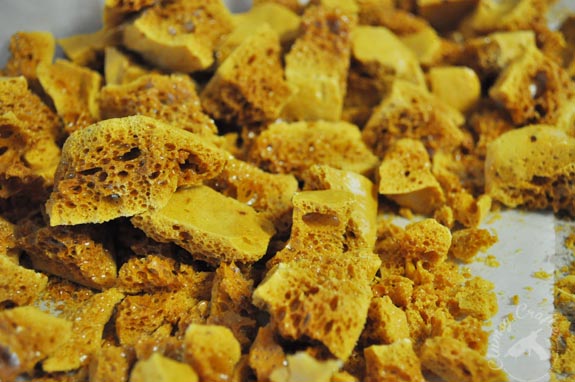
You’re going to be left with a pile of honeycomb candy such as this. The great part is that you can eat it just like this! It’s still yummy. But if you’re in a high humidity area, such as Houston, the candy will start melting if not stored airtight. So the best option for me is to cover it in chocolate to make it last longer.

You can use any type of chocolate that you wish such as milk chocolate chips or dark chocolate chips to cover the candy. I went for the easy route and just picked up chocolate candy coating at the grocery store (in the baking aisle).
Melt the chocolate in your microwave. Slowly dip the candy into the chocolate, using a spoon to make sure all sides are covered. Then use a fork to pick up the candy and tap it lightly on the side of the bowl to get rid of excess chocolate before placing it on parchment paper to set. If you use real chocolate chips the chocolate can take up to an hour to harden. The chocolate candy coating was set in minutes.
Once the chocolate has hardened, you’re ready to go!
Try a piece and then come back here and tell me what you think.
You can find this recipe on my Pinterest page as well.


- 1/4 cup honey
- 1/2 cup corn syrup
- 2 cups sugar
- 3 tablespoons water
- 1 tablespoon baking soda
- Chocolate Candy Coating
- Combine honey, corn syrup, sugar and water in a deep pan on the stove. Stir together quickly and then turn the stovetop to medium high and do not stir again. Watch closely to keep from bubbling over. Cook until mixture reaches 300 degrees, about 12-13 minutes and a light amber color.
- While mixture is cooking, prepare a deep pan by lining it with parchment paper and greasing it liberally.
- When mixture is at 300 degrees or a light amber brown, remove from heat and quickly stir in 1 tablespoon of baking soda. Mixture will expand rapidly.
- Pour into prepared pan and let cool and harden for 30 minutes.
- When the candy is hard, cut into smaller pieces over a sheet of parchment paper.
- Melt chocolate in microwave according to package directions. Coat candy in chocolate and set aside on parchment paper to harden.
- Enjoy!
The post Chocolate Covered Honeycomb Candy Recipe – It’s the Bees Knees appeared first on Clumsy Crafter .
[…] Chocolate Covered Honeycomb Candy Recipe […]