
I’ve wandered past the packages of air dry clay at the craft store many times thinking, “what can I make with air dry clay?”. It’s like playdoh but for
And I’ll let you in on a little secret – I made these leaves out of terra cotta air dry clay last year. I just never took a finished picture. So this weekend I dug the leaves out of the fall storage box and took some finished pictures and they look just as good as the day I put them into the box. This stuff lasts.
I also made a little pumpkin ring dish using this clay but I don’t know where that walked off to. I’m guessing a kid took it and it’s forever buried in the back yard.
Today I’m going to show you how to make leaves using air dry clay because leaves are easy to decorate with.
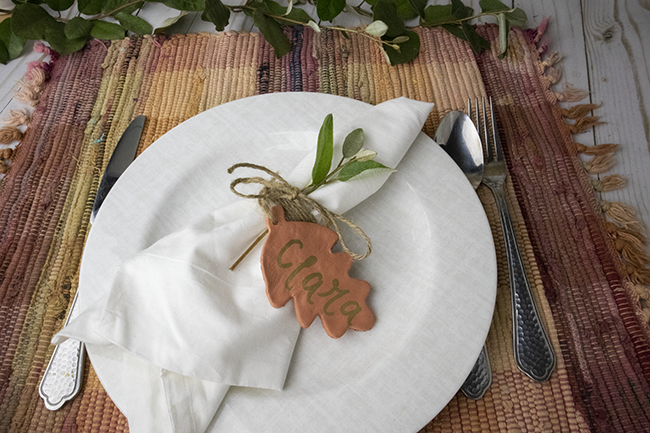
You can use these as place markers for Thanksgiving dinner, add wire to the stem and stick them in a wreath, hang them from a painted mason jar as decoration, use them as gift tags or even a piece of jewelry. The options really are endless.

How to Use Air Dry Clay to Make Decorations
The first thing you want to do to make these fun fall leaves decorations is to gather your supplies. This is pretty easy.
This post contains affiliate links
You’ll need:
- a bowl of water
- something to protect
your workspace – I recommend Freezer Paper (shiny side up) - leaf-shaped cookie cutter
- a rolling pin
- a leaf or two with pronounced veins
- a knife or sharp blade.
- air dry clay – terracotta color

This project gets a little messy so it’s best to keep a rag handy to wipe your hands. As you’ll see, mine get covered in clay but the end results were worth it.
The first thing you want to do is to prepare your work station. I laid down Freezer Paper, shiny side up, in a place where these leaves could be left for a few hours without moving them.
Next you need to break off a part of the clay, about 1/4th, and start working it in your hands to get it softer. This part takes a little time and strength but just keep going.
Once

Once you have it flat, take a little bit of water on your fingers and smooth the top of it as best as you can. You don’t want it to get too wet because it will wrinkle, like my face, but just a tiny bit will help.

Next cut your shapes out of the clay using your leaf cookie cutters.
Once you have the leaf shape cut out, leave the leaf where it is and peel away the excess clay from the sides.

As you pull away the excess, you might find a few rough edges around the outside of the leaf. Use a fingernail or a small knife to smooth these areas with a little water.
Once I cut the leaf shapes, I left them in that same spot to harden.

If you look close, some of them look smoother than others. The smooth ones I left so that I could write on them when they were dry with oil paint pens but the rough ones I pressed a leaf into to give them a leaf texture.

The final step was to use a knife to make a small circular opening in the leaf stem. This way I could hang it with twine from the mason jar or tie it onto a table place setting.
Once they were how I wanted them to be, I pulled the Freezer Paper over to one side of the table and moved onto another project.

If you want to make a similar wildflower pumpkin or see the finished project – click here -> The Pioneer Woman Inspired Wildflower Pumpkin .
Then you can carefully move them to a different location to finish drying. The will take 24-48 hours to dry unless they are very thick. If you cut them really thick, it might take a day longer.

If you love this project and want to save it for later, here’s an image you can save to Pinterest:

The post Easy Fall Decorations Using Air Dry Clay appeared first on Clumsy Crafter .
[…] After I cut these out, I poked a hole in the top of each leaf and tied to them to twine to make leaf bunting. However I think these would make adorable place cards for thanksgiving. Simply tie them onto your napkins similar to what I did with these air dry clay leaves: […]