Floating Glitter Necklace Using Resin – Part 2 – Details on How to Make Each Look
By:
Bobbie Byrd
 Part 1 of this post was so long that I had to break it into two parts. If you haven’t read part 1 – Floating Glitter with Resin Necklace
– pause and then go back and read that one first.
This post is going to break down how I made several different looks with the necklaces and also give a few more tips about working with resin.
So let’s buckle in and get started.
Part 1 of this post was so long that I had to break it into two parts. If you haven’t read part 1 – Floating Glitter with Resin Necklace
– pause and then go back and read that one first.
This post is going to break down how I made several different looks with the necklaces and also give a few more tips about working with resin.
So let’s buckle in and get started. Option 1 – Large Round Open Frame with Tunnel of Love – Glitter Style
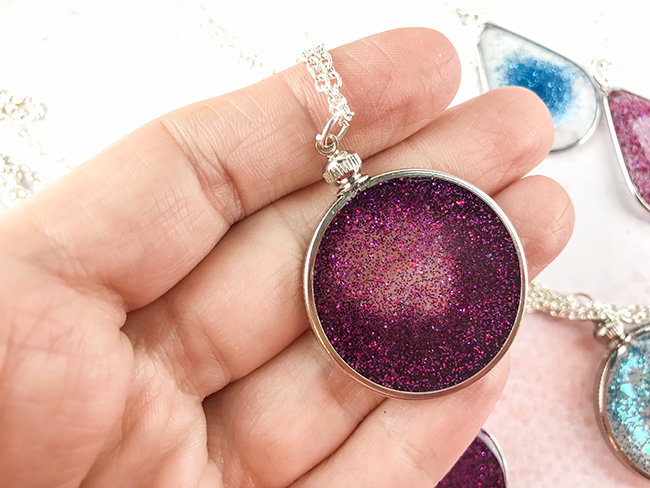 OK so tunnel of love might be a little dramatic but this turned out to be one of my favorite ones. Why? Because the deepness of the silver frame allows it to have a lot of depth in how it looks. When you look at this one you can see straight through it but that means that you can also see layers upon layers of glitter. It’s fascinating in person. When I look straight at it, I almost feel like I’m falling into a galaxy of glitter.
How can you make this one?
To make it you need a deeper open back bezel such as this one
or this one
.
Follow all the steps listed in the first post to prepare the frame.
Next, take a small amount of resin in a seperate container and mix two different colors of glitter straight into the resin. For this one I used a dark red and purplish red fine glitter. The glitter concentration was pretty dense and you couldn’t see through the mix.
Take your open back bezel frame, which should be already attached to blue tape and fill the bottom layer of it with the glitter / resin mix. Do not fill it all the way to the top.
Now take clear resin and slowly pour it directly into the middle of the pendant. The clear resin will slowly push all the glitter to the sides, leaving an open space in the middle and creating the layers of glitter.
Keep dripping clear resin into the same spot until it’s filled to the top. Do not pour extra resin into this one, which would create the domed or rounded top. Fill it until the top is even with the frame and stop.
Let the resin harden and you’re ready to wear it.
OK so tunnel of love might be a little dramatic but this turned out to be one of my favorite ones. Why? Because the deepness of the silver frame allows it to have a lot of depth in how it looks. When you look at this one you can see straight through it but that means that you can also see layers upon layers of glitter. It’s fascinating in person. When I look straight at it, I almost feel like I’m falling into a galaxy of glitter.
How can you make this one?
To make it you need a deeper open back bezel such as this one
or this one
.
Follow all the steps listed in the first post to prepare the frame.
Next, take a small amount of resin in a seperate container and mix two different colors of glitter straight into the resin. For this one I used a dark red and purplish red fine glitter. The glitter concentration was pretty dense and you couldn’t see through the mix.
Take your open back bezel frame, which should be already attached to blue tape and fill the bottom layer of it with the glitter / resin mix. Do not fill it all the way to the top.
Now take clear resin and slowly pour it directly into the middle of the pendant. The clear resin will slowly push all the glitter to the sides, leaving an open space in the middle and creating the layers of glitter.
Keep dripping clear resin into the same spot until it’s filled to the top. Do not pour extra resin into this one, which would create the domed or rounded top. Fill it until the top is even with the frame and stop.
Let the resin harden and you’re ready to wear it. Option 2 – Just Glitter (and People Love It)
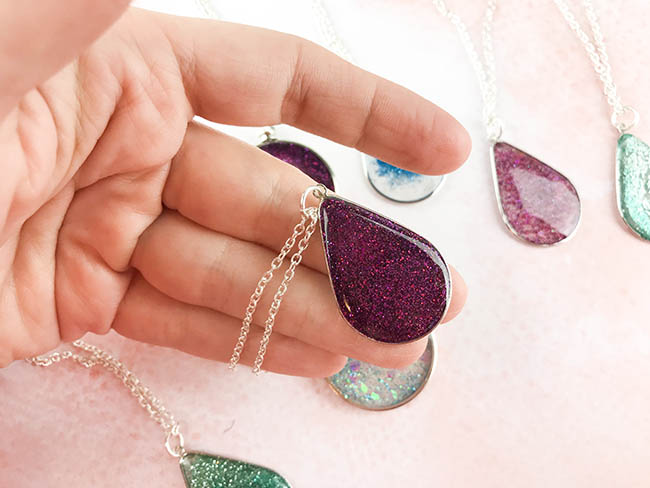 The other day I put up a picture of all of the necklaces that I had just made and asked people which one was their favorite. The overwhelming favorite was this one, which I did not expect to happen at all! I love this one but I have others that I’m head over heels for. However people just loved this one and the great news is that it’s the easiest one to make! So if you want to make teachers gifts or do this for something else that will require a lot of them to be made, this is the route I suggest you go.
How do you make this one? Simple, simple, simple. Remember in the first one that I showed you, the first step was to mix two like shades of glitter into the resin? This was made using the rest of that resin.
This one was made simply by mixing two shades of glitter into resin until you couldn’t see through the mix. Carefully pour it into the frame, pushing it against the sides with a toothpick or stir stick. The main difference is that I did let this one dome. which means that I poured extra to make a rounded top.
The longer your resin has been made, the easier it will dome. However don’t wait too long or you won’t be able to use it.
The other day I put up a picture of all of the necklaces that I had just made and asked people which one was their favorite. The overwhelming favorite was this one, which I did not expect to happen at all! I love this one but I have others that I’m head over heels for. However people just loved this one and the great news is that it’s the easiest one to make! So if you want to make teachers gifts or do this for something else that will require a lot of them to be made, this is the route I suggest you go.
How do you make this one? Simple, simple, simple. Remember in the first one that I showed you, the first step was to mix two like shades of glitter into the resin? This was made using the rest of that resin.
This one was made simply by mixing two shades of glitter into resin until you couldn’t see through the mix. Carefully pour it into the frame, pushing it against the sides with a toothpick or stir stick. The main difference is that I did let this one dome. which means that I poured extra to make a rounded top.
The longer your resin has been made, the easier it will dome. However don’t wait too long or you won’t be able to use it. 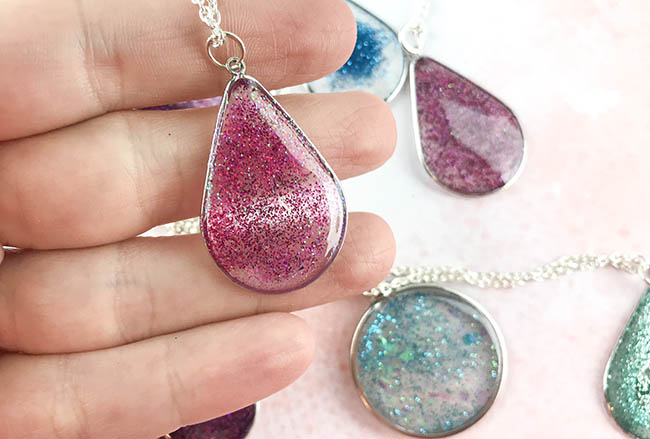 If you want it to be more see through, use less glitter and then you’ll have a pendant that looks like the one in the picture above.
Another great style that you can make is to drizzle a tiny bit of clear resin into the glitter resin. It makes a crack through the resin that adds a fun bit of detail.
If you want it to be more see through, use less glitter and then you’ll have a pendant that looks like the one in the picture above.
Another great style that you can make is to drizzle a tiny bit of clear resin into the glitter resin. It makes a crack through the resin that adds a fun bit of detail. Option 3 – Clear Floating Glitter Pendant (My Favorite)
 This is my second favorite pendant. Why? Because this one truly makes the glitter look like it’s floating in space.
Actually when I started this project, my plan was to make all of the pendants look like this one but it was too much fun to experiment with other looks.
To make this look, start with your open frame bezel attached the painter’s tape. Carefully place a small pile of glitter in the middle of the frame. Pour clear resin around the glitter but not into it. Stay closer to the frame with the resin. Using a toothpick or stir stick, slowly pull the resin into the pile of glitter and make sure it’s mixed well within the resin but still in it’s place. If the glitter starts to go further than you want it to, add a touch of resin to the outside edge of the frame and pull it toward the middle, which will bring the glitter back to the middle as well.
Watch the process on this video:
Other options include:
This is my second favorite pendant. Why? Because this one truly makes the glitter look like it’s floating in space.
Actually when I started this project, my plan was to make all of the pendants look like this one but it was too much fun to experiment with other looks.
To make this look, start with your open frame bezel attached the painter’s tape. Carefully place a small pile of glitter in the middle of the frame. Pour clear resin around the glitter but not into it. Stay closer to the frame with the resin. Using a toothpick or stir stick, slowly pull the resin into the pile of glitter and make sure it’s mixed well within the resin but still in it’s place. If the glitter starts to go further than you want it to, add a touch of resin to the outside edge of the frame and pull it toward the middle, which will bring the glitter back to the middle as well.
Watch the process on this video:
Other options include: - Creating an ombre effect by using a light color glitter on top of the frame and a darker color on the bottom.
- Using large glitter flakes as accents
- Adding things other than glitter. You could try adding small seed beads or tiny trinkets.
 If you want a simpler tutorial, don’t forget to check out the Glitter Necklace made with Mod Podge!
If you need to go back to the first post to get a refresher as to the steps you need to take to start this project, click here
.
If you want a simpler tutorial, don’t forget to check out the Glitter Necklace made with Mod Podge!
If you need to go back to the first post to get a refresher as to the steps you need to take to start this project, click here
.
The post Floating Glitter Necklace Using Resin – Part 2 – Details on How to Make Each Look appeared first on Clumsy Crafter .
Labels:
As a novice to cold enamelling can you tell me where I can get reasonably priced resins and hardness please
[…] Unfortunately there’s so much information that goes with this post that I’m going to have to break it up into 2 parts. I hate doing that but it’s just the only option. After you’re done reading this post, you can find out how to make some of the different styles of Glitter Necklaces on this post. […]