You Can Make This! Floating Glitter Necklace Using Resin
By:
Bobbie Byrd
 Glitter makes me happy. Shiny things make me happy. Shiny things with glitter = bliss. Awhile back I saw a picture of a piece of jewelry that looked like a leaf was floating in the middle of a hoop using resin. I was obsessed. Since then I’ve spent hours on Pinterest looking at resin jewelry tutorials and how to make resin jewelry posts. That’s when I knew that I had to try it myself but I wanted it filled with glitter.
The amazing thing about using resin to make these glitter pendants is that it looks like the glitter is floating. Plus they are all just a tiny bit see thru, which adds a unexpected layer of detail. This is a necklace that you will get a ton of compliments when you wear it.
Before we go any further let me say this:
Glitter makes me happy. Shiny things make me happy. Shiny things with glitter = bliss. Awhile back I saw a picture of a piece of jewelry that looked like a leaf was floating in the middle of a hoop using resin. I was obsessed. Since then I’ve spent hours on Pinterest looking at resin jewelry tutorials and how to make resin jewelry posts. That’s when I knew that I had to try it myself but I wanted it filled with glitter.
The amazing thing about using resin to make these glitter pendants is that it looks like the glitter is floating. Plus they are all just a tiny bit see thru, which adds a unexpected layer of detail. This is a necklace that you will get a ton of compliments when you wear it.
Before we go any further let me say this: - I always try to bring you easy quick crafts because I know that life is busy. This craft is easy but it is not quick. It will take time but it’s worth it!
- Unfortunately there’s so much information that goes with this post that I’m going to have to break it up into 2 parts. I hate doing that but it’s just the only option. After you’re done reading this post, you can find out how to make some of the different styles of Glitter Necklaces on this post.
This post contains affiliate links
Supplies You Need to Make This Glitter Resin Pendant:
- Resin – There’s a lot of different resin. I used this smaller kit specifically for jewelry by EnviroTex and it was more than enough to make 8 pendants. I still have about half of it left (and plan on using it soon because I’m hooked!) The kit included small containers to mix the resin in as well as two stir sticks.
- Open Frame Pendants – Both of these items that I used were found at Hobby Lobby. Michaels did not carry them at all that I could find. Amazon actually has a huge selection of open frame pendants . You want ones that are solid all the way around. I’ll talk more about this below and how to solve it if they’re not solid.
- Glitter– I used some fine glitter and some larger chunkier versions as well.
- Materials to protect your workspacewhen working with the resin such as a trash bag or plastic sheeting. I used tin foil covered with wax paper.
- Blue Painters Tape – I tried clear packing tape and it did not work for me.
Step One: Preparing the Resin
 Resin actually comes in two separate bottles. In order for it to harden, you have to mix exact proportions of the resin together which creates the ability for it to dry hard and shiny.
This is actually easier than it sounds. If you’ve ever poured liquid medicine into a medicine cup for a child, you can do this.
The recommended minimum amount of resin to mix is 15 ml. Which means that you would need to mix 8ml of the Resin mix and 8ml of the hardener mix together to make 16ml. This amount will probably make about 4-6 pendants depending on the size of the frame that you use.
Use a sharpie to mark on the small plastic mixing cup the exact amounts. For instance, mark a line at 8ml for your resin mix and then go up and make another mark at 16ml for your hardener mix. Pour in the resin mix first exactly to the 8ml line and then fill the cup the rest of the way with hardener.
Resin actually comes in two separate bottles. In order for it to harden, you have to mix exact proportions of the resin together which creates the ability for it to dry hard and shiny.
This is actually easier than it sounds. If you’ve ever poured liquid medicine into a medicine cup for a child, you can do this.
The recommended minimum amount of resin to mix is 15 ml. Which means that you would need to mix 8ml of the Resin mix and 8ml of the hardener mix together to make 16ml. This amount will probably make about 4-6 pendants depending on the size of the frame that you use.
Use a sharpie to mark on the small plastic mixing cup the exact amounts. For instance, mark a line at 8ml for your resin mix and then go up and make another mark at 16ml for your hardener mix. Pour in the resin mix first exactly to the 8ml line and then fill the cup the rest of the way with hardener.  Once you have both parts of the resin poured into the measuring cup, slowly… and I mean sloooowly… mix the resin for 2 minutes. Why slowly? Because if you don’t you will stir air bubbles into it. You also want to scrape the sides of the mixing cup as you go.
Once your resin is mixed, set it to the side for 5 – 10 minutes for it to thicken as you prepare the next step.
Once you have both parts of the resin poured into the measuring cup, slowly… and I mean sloooowly… mix the resin for 2 minutes. Why slowly? Because if you don’t you will stir air bubbles into it. You also want to scrape the sides of the mixing cup as you go.
Once your resin is mixed, set it to the side for 5 – 10 minutes for it to thicken as you prepare the next step. Step 2: Preparing the Frames for Resin
I bought two different kinds of frames but both of them needed a little bit of alteration.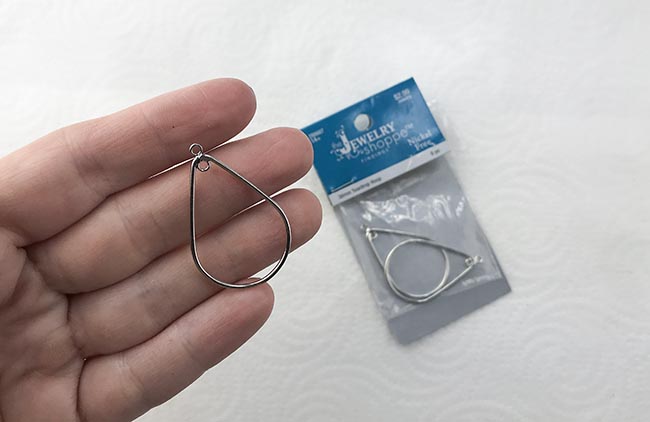 I bought one package of these frames which came with 6 frames in it but as you can see in the picture, the top of the frame had a little hoop inside the frame as well. I didn’t want this hoop inside of the frame so I used a pair of snips and removed it.
The second frame I bought actually came with glass that you could put inside the frame and then screw the frame closed. I just liked how it looked but didn’t want the glass. So I ditched the glass inserts but needed a way to close up the small separation in the frame.
If the frame you’re using has any break in it, your resin will leak out of it.
I bought one package of these frames which came with 6 frames in it but as you can see in the picture, the top of the frame had a little hoop inside the frame as well. I didn’t want this hoop inside of the frame so I used a pair of snips and removed it.
The second frame I bought actually came with glass that you could put inside the frame and then screw the frame closed. I just liked how it looked but didn’t want the glass. So I ditched the glass inserts but needed a way to close up the small separation in the frame.
If the frame you’re using has any break in it, your resin will leak out of it.  I used several coats of clear nail polish to close up the small break in the frame and this worked well. You might have to try around with other things.
Once your frame is ready, it’s time to break out the blue painter’s tape.
I used several coats of clear nail polish to close up the small break in the frame and this worked well. You might have to try around with other things.
Once your frame is ready, it’s time to break out the blue painter’s tape.  Tear off a piece of tape just slightly larger than the frame. Press the frame onto the tape and then flip it over and use something hard to really burnish the frame onto the tape. Make sure you get all of the edges, especially near the top of anywhere that isn’t perfectly flat.
Once that’s done use a two small pieces of tape to secure this to your work surface. You want it to stay flat and it’s easy to get your hand stuck in the tape and drag it. Taping it down helps keep it in one place.
Tear off a piece of tape just slightly larger than the frame. Press the frame onto the tape and then flip it over and use something hard to really burnish the frame onto the tape. Make sure you get all of the edges, especially near the top of anywhere that isn’t perfectly flat.
Once that’s done use a two small pieces of tape to secure this to your work surface. You want it to stay flat and it’s easy to get your hand stuck in the tape and drag it. Taping it down helps keep it in one place. Step 3: Pour the Resin
Now it’s time to get excited. Once all of your frames are ready, it’s time to pour the resin. Since this is already a super long post, I’m just going to go over the process. In my next post I’ll share details on how to get each individual look First add your glitter (this might vary a little depending on the finished look but we’re just going to start with this). Next take your resin and add a little tiny bit inside the frame. You’ll be shocked by how fast the frame fills up. You don’t want to overfill it and make it pour over the edge so go slowly and add a tiny bit at a time.
Use the stir stick or a tooth pick to spread out the resin to the edges of the frame. Add more resin until you’re happy with the look.
First add your glitter (this might vary a little depending on the finished look but we’re just going to start with this). Next take your resin and add a little tiny bit inside the frame. You’ll be shocked by how fast the frame fills up. You don’t want to overfill it and make it pour over the edge so go slowly and add a tiny bit at a time.
Use the stir stick or a tooth pick to spread out the resin to the edges of the frame. Add more resin until you’re happy with the look.  You can pour the resin to line up flat with the edges of the frame or make it dome by adding a little bit more resin and making a nice curve on top.
Once your resin is poured into the frames you might notice a few air bubbles.
Use a straw and gently blow on the surface of the resin to pop these bubbles (the warmth from your breath pops them) but be careful not to get any moisture on the resin.
After about 12 hours the resin will be soft and pliable. If you did have any spills out of the frame, you can use scissors at this point to trim off the excess resin.
Here’s a video that shows the entire process of making these pendants.
You can pour the resin to line up flat with the edges of the frame or make it dome by adding a little bit more resin and making a nice curve on top.
Once your resin is poured into the frames you might notice a few air bubbles.
Use a straw and gently blow on the surface of the resin to pop these bubbles (the warmth from your breath pops them) but be careful not to get any moisture on the resin.
After about 12 hours the resin will be soft and pliable. If you did have any spills out of the frame, you can use scissors at this point to trim off the excess resin.
Here’s a video that shows the entire process of making these pendants. Step 4: Finish Up Your Resin Pendant
After 24 hours you can safely peel the tape off of the back of your pendant. (Confession: I couldn’t wait and pulled off the tape sooner because I was so excited.) If there’s any sticky left on the back of the pendant from the tape, remove it with goo gone.
Add jump rings to your pendants and hang them on a chain.
That’s it! It’s intensive but so.. so…so worth it!
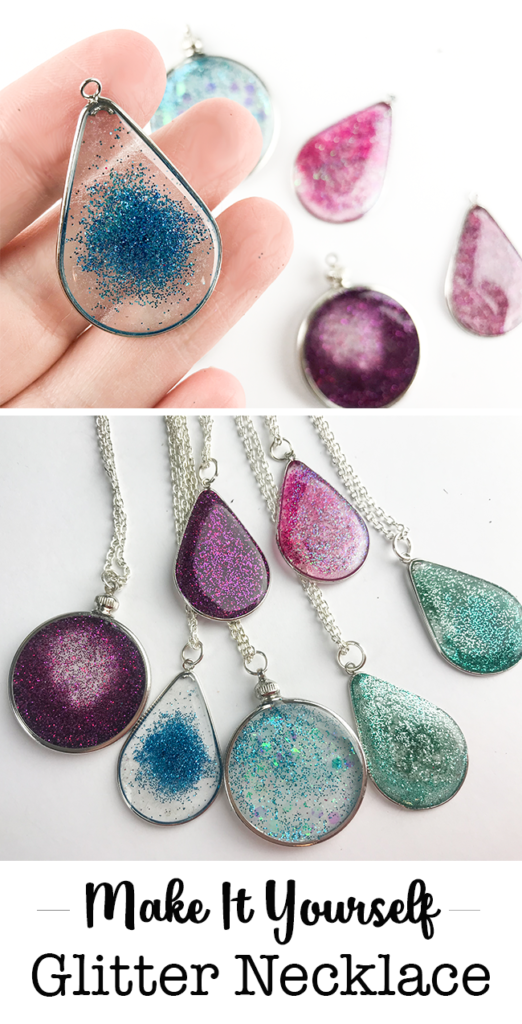
The results are unbelievable and honestly, if you think these look good on your screen you should see them in person.
If there’s any sticky left on the back of the pendant from the tape, remove it with goo gone.
Add jump rings to your pendants and hang them on a chain.
That’s it! It’s intensive but so.. so…so worth it!
The results are unbelievable and honestly, if you think these look good on your screen you should see them in person. 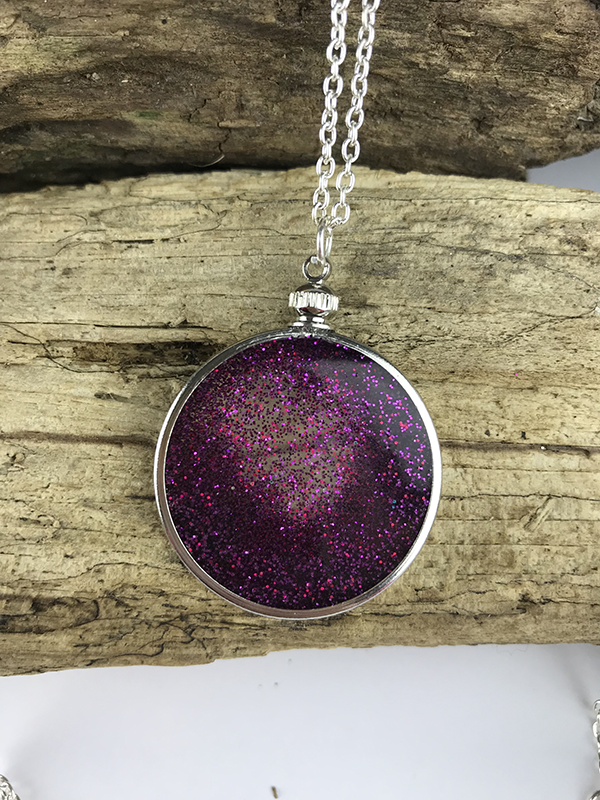 This one is one of my favorites. You can’t tell as much from the picture but the glitter looks like it’s suspended in space and it gets deeper toward the bottom. There’s just so much depth and shimmer to it.
  Love, Love, Love.
Do you want to know how to make each look such as the floating glitter on the left or the full glitter on the right? Don’t worry, this post on the different styles of glitter necklaces
will help and also gives you some videos to watch as well.
Don’t forget to click over and read Part 2.
If you love this, please do me a favor and Save this Idea to Pinterest
.
Love, Love, Love.
Do you want to know how to make each look such as the floating glitter on the left or the full glitter on the right? Don’t worry, this post on the different styles of glitter necklaces
will help and also gives you some videos to watch as well.
Don’t forget to click over and read Part 2.
If you love this, please do me a favor and Save this Idea to Pinterest
. 
The post You Can Make This! Floating Glitter Necklace Using Resin appeared first on Clumsy Crafter .
[…] 2. Floating Glitter Necklace […]
[…] just not me. I make a ton of jewelry like you can see here in the Leather Earring Tutorial or the Floating Glitter Necklaces but I rarely wear it. All that jewelry looks gorgeous sitting on my bathroom counter, which is where […]
It’s going to be ending of mine day, but before ending I am
reading this great article to improve my experience.
I have been browsing online more than 3 hours today, yet I never
found any interesting article like yours. It is pretty worth enough for me.
Personally, if all site owners and bloggers made good content as you did, the net will be much
more useful than ever before.